

Project Review / Install Overview: PRG Snorkel
![Image]()
Why I chose to add a snorkel to my rig:
I did it to compliment my rear rear breather (SCUBA) modifications, and to keep the sand out of my pre-filter on the beach (I spend a ton of time oversand in the summer). Oh and to gain some water fording capability along the way. Thanks to ZEUSMOTORWORKS for some advice, a reference and general question answering.
I know this PRG snorkel comes with some philosophical baggage, but I read up, saw quality reviews, weighed the ethics and realized that there was no evidence of an injunction out there. So that's a fair game product at a fair game price in my mind. Besides, all the logos and branding turned me off to the "other leading brand" anyhow. All-in-all, the instructions were concise (though looked strikingly familiar to MetalTech's Snorkel how-to-intall-the-other-leading-brand Youtube video), the materials were super, super solid and only slight adjustments were needed on the template. I'd recommend checking it against your snorkel first, though you never truly know until you do a dry-run mount.
I plan to wait a few weeks to give you my performance impression. In the meantime, here's what I noticed with install. I'm pretty new to mechanic work, but that doesn't hold me back from diving in and trying. If you see bad technique, feel free to correct, but please keep it constructive.
This is how the snorkel came out of the box. i chose to clean up some of the molding with a blade.
![Image]()
Overview of tools: (In general order of first appearance)
Allen Key (Included in Kit)
Loctite Threadlock
Phillips Head Screwdriver
Flat Head Screwdriver
Utility Knife or Multi Tool
Painter's Tape
1/8" Countersink
3/16" - 7/8" Unibit
1 1/4" - 6 7/8" Auger
105mm (4 1/8") Hole Saw
3/4" X 1 1/4" Grinding stone
Primer & Color Match Paint
Pop Riveter with 3/16" compatible chuck
Various Sockets (Including Drivers, Adaptor and Extensions)
Dorman 10 pcs. 1/2 in. Nylon Push-In Rivet (799-105) (for anything cut or broken on fender lining)
![Image]()
Not pictured here: Pop riveter, countersink and a standard set of tools. Pro-tip: The need for a pop riveter is not written into the instructions. In fact, they refer to self-tapping screws. However, go with the pop-riveter. It works and works very well.
Overview of kitted parts: (In general order of first appearance)
(8) Snorkel Body Studs
(3) 3/16" Pop Rivets
(8) Washers
(8) Nuts
(3) Small Screws (for A-Pillar snorkel neck mount)
(3) Hose Clamps
![Image]()
Here are the washers, rivets, bolts and nuts. Not pictured here are the snorkel body studs.
Pre-work: Snorkel body mounts
![Image]()
Test the studs in the snorkel body before applying Loctite and threading. Make sure the allen key side is facing up.
After removing the screws/clips in fender liner (using a Flathead or clip removal tool), pop the hood and detach air hose with a Phillips Head. Pro-tip: For the Fender Liner, I chose to only remove the the outermost screws/clips, pull out the fender slightly and pull down the liner. It's a bit tighter this way, but it saves a lot of time on the back end.
![Image]()
Remove the pre-filter by loosening the two anchoring hex bolts.
![Image]()
Having an extension here is important.
What's remains is some nice naked space used to jimmy the hard(est) to reach fender clips. This is another big time (and effort) saver.
![Image]()
I then removed the bolts to the OEM air ram with my Phillips head screwdriver.
![Image]()
Seeya later.
Applying and aligning the template was easy; a few simple marks, and now we can drill. Remember to remove the template before drilling and apply painters tape to keep your cut clean from chips. Relax, get one under your belt and you'll feel great about this.
![Image]()
I used the countersink to drill pilots, then used a uni-bit up to 5/8" to get me close to 16mm. Pro-tip: I recommend using a new Uni-bit, Hole Saw and Auger)
One more to go... (this is the big boy)
![Image]()
Go easy, go confidently. Pro-tip: Only apply pressure with the blade already spinning. Bacon grease is a nice, natural lubricant. The Auger should also help prevent the saw from skipping.
![Image]()
Clean up the holes with a grinding stone and DO NOT FORGET TO PRIME AND PAINT to reduce risk of oxidation.
![Image]()
All holes drilled.
![Image]()
Do a dry run mount on the snorkel body after placing painters tape on the A-pillar. Outline the A-Pillar snorkel neck mount on the painters tape
![Image]()
Drill your pilots, remove the tape, and pop-rivet that sucker on. It's sturrrrrdy.
![Image]()
Remount the snorkel body and tighten up the 9 remaining holes by placing a washer and nylon threaded bolt on each. Pro-tip: Use a small ratchet.
![Image]()
Batten down the A-pillar snorkel neck mount that you previously pop riveted with a Phillips Head Screw Driver. Pro-tip: Don't fumble around the side view mirror to get at the securement screws... open the door!
![Image]()
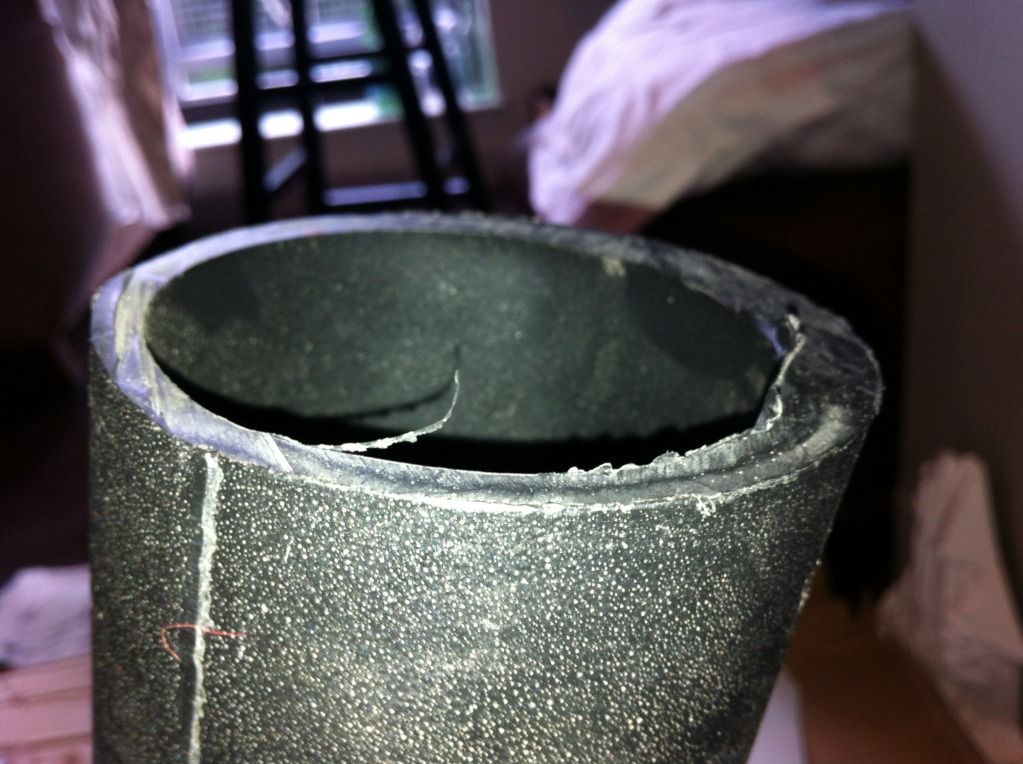
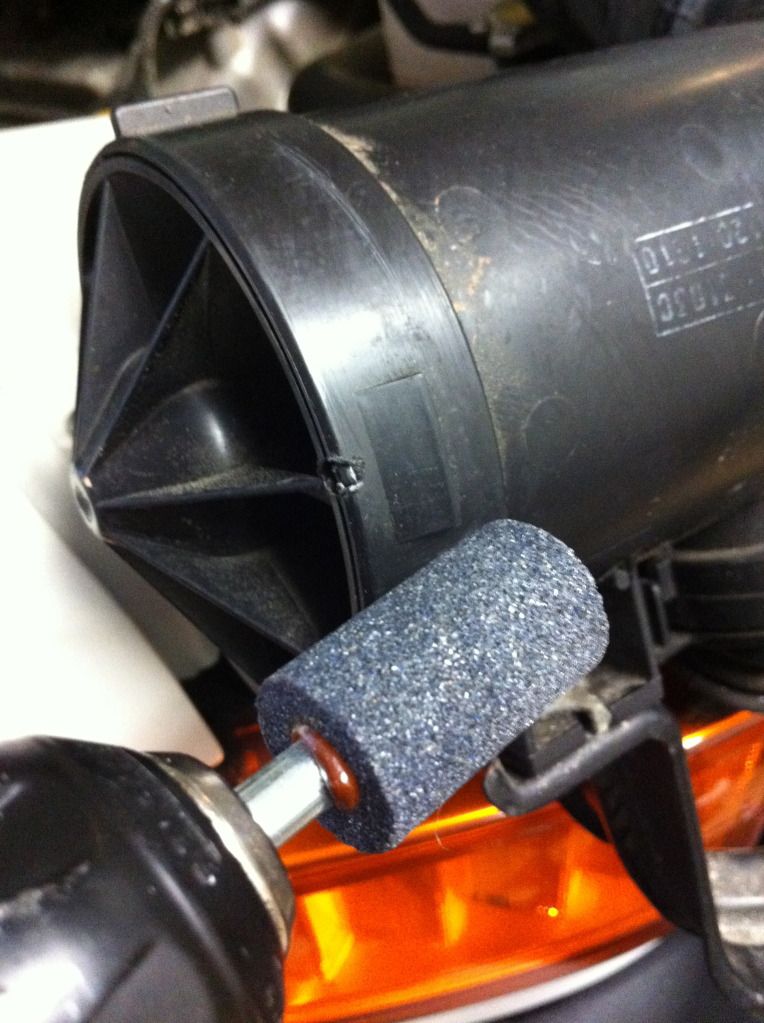
Go back to the pre-filter, remove the coupling and grind down the notches with the stone bit you used to clean up the holes you just drilled in the quarter panel.
Before:
![Image]()
After:
![Image]()
Getting the small end of the snorkel-to-pre-filter bridge on was living hell. It took 4 hands, a blow dryer, a butter knife and pure, unadultered rage. Pro-tip: Find a way to enjoy the rage.
![Image]()
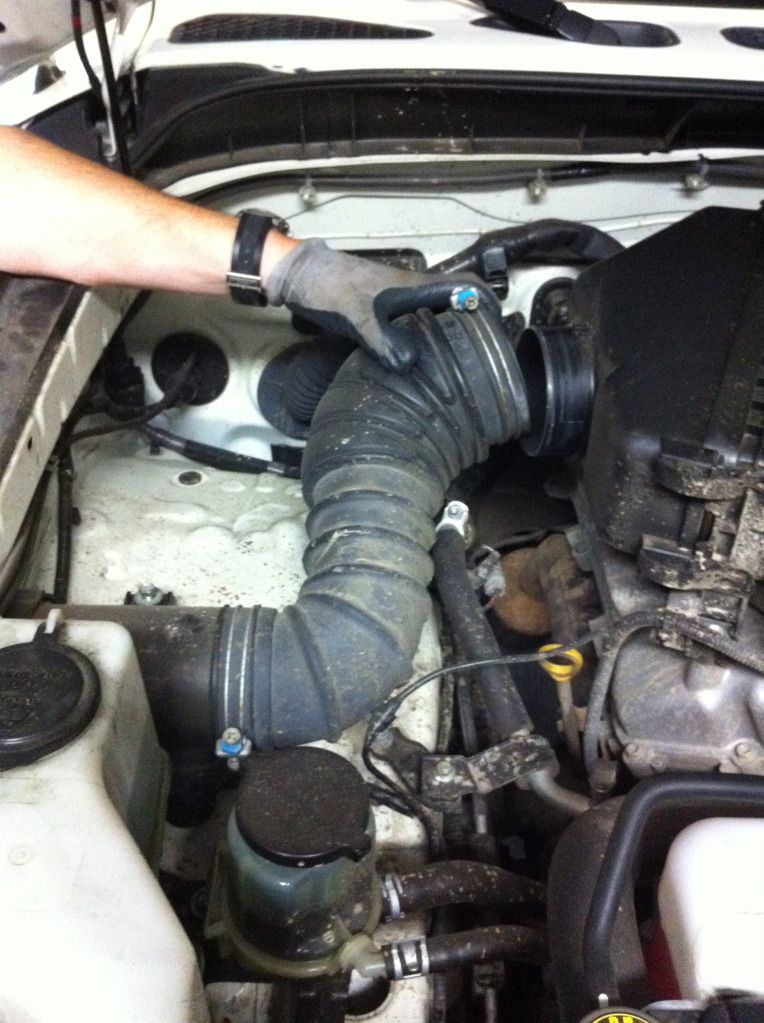
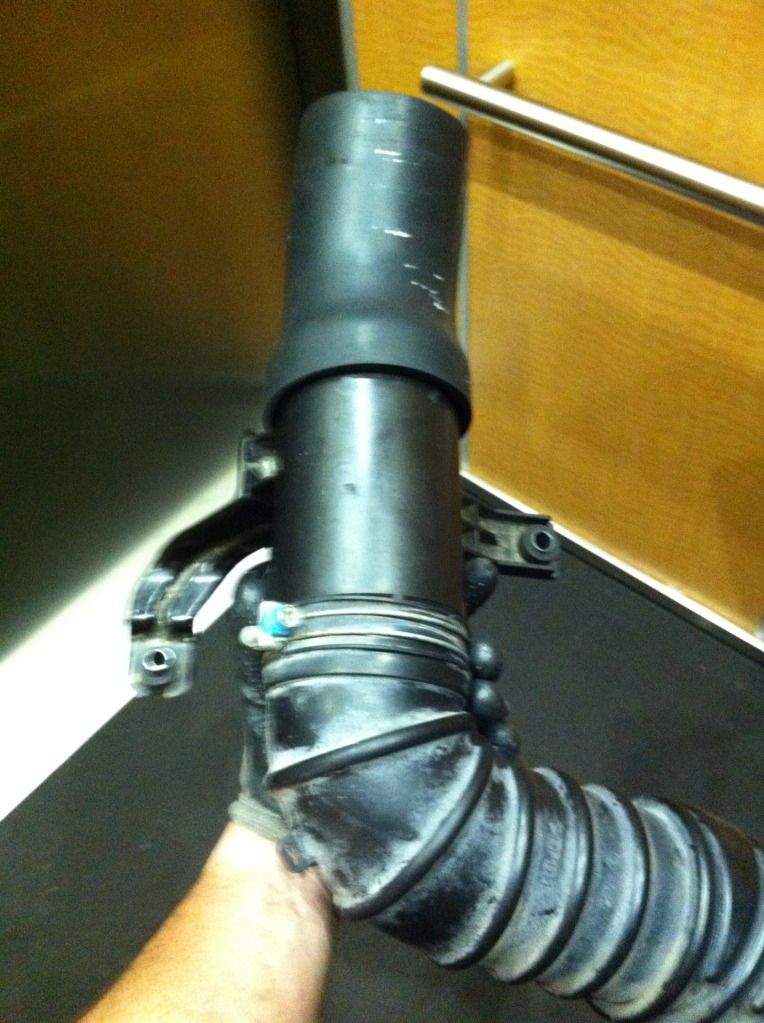
Almost there now... Just feed the bridge through the fender to the snorkel stub. Don't forget to thread it through your silver hose clamps! And be sure to bolt down the pre-filter mounts prior to tightening the hose clamps with the Flat Head. You'll need to tighten those after you're comfortable with the fit. This is done with the Flat Head Screw Driver. The Toyota air hose clamps will take a Phillips Head.
![Image]()
The air ram is the cherry on top. A simple black hose clamp secures this into place. This time, use a Flat Head.
![Image]()
Lastly, you'll need to get the wheel well snapped, clamped and bolted together again. I needed some fresh air and wide open space for this.
![Image]()
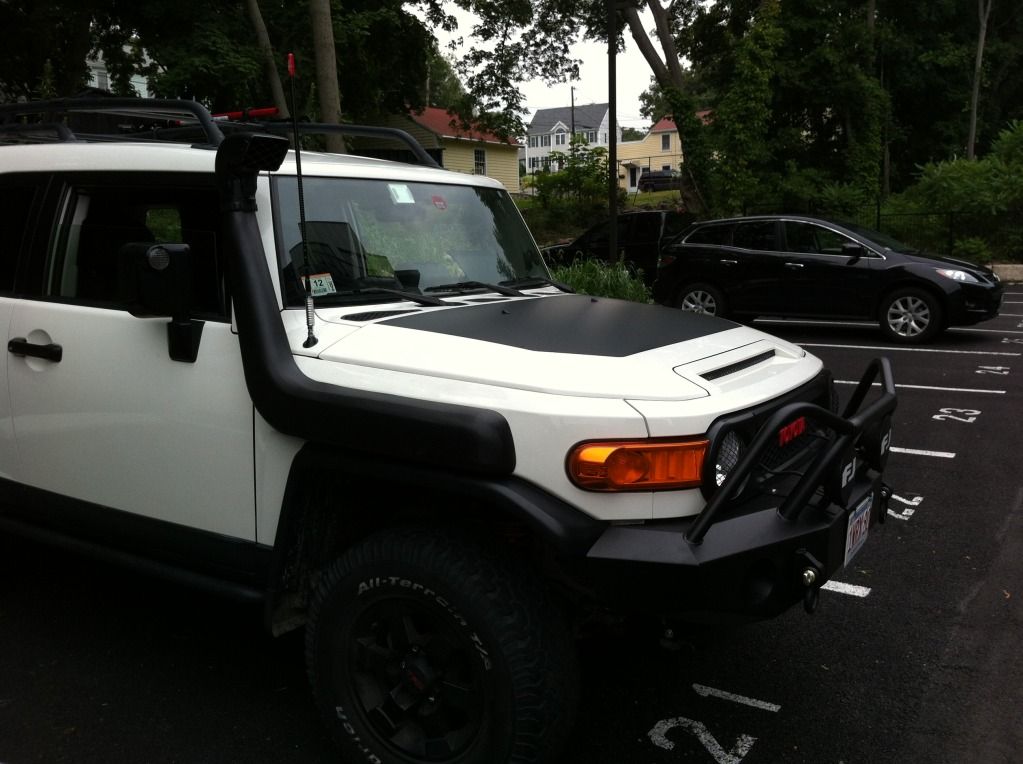
And here's the final product:
![Image]()
Hope this helps anyone who's sitting on the fence with PRG.
Why I chose to add a snorkel to my rig:
I did it to compliment my rear rear breather (SCUBA) modifications, and to keep the sand out of my pre-filter on the beach (I spend a ton of time oversand in the summer). Oh and to gain some water fording capability along the way. Thanks to ZEUSMOTORWORKS for some advice, a reference and general question answering.
I know this PRG snorkel comes with some philosophical baggage, but I read up, saw quality reviews, weighed the ethics and realized that there was no evidence of an injunction out there. So that's a fair game product at a fair game price in my mind. Besides, all the logos and branding turned me off to the "other leading brand" anyhow. All-in-all, the instructions were concise (though looked strikingly familiar to MetalTech's Snorkel how-to-intall-the-other-leading-brand Youtube video), the materials were super, super solid and only slight adjustments were needed on the template. I'd recommend checking it against your snorkel first, though you never truly know until you do a dry-run mount.
I plan to wait a few weeks to give you my performance impression. In the meantime, here's what I noticed with install. I'm pretty new to mechanic work, but that doesn't hold me back from diving in and trying. If you see bad technique, feel free to correct, but please keep it constructive.
This is how the snorkel came out of the box. i chose to clean up some of the molding with a blade.
Overview of tools: (In general order of first appearance)
Allen Key (Included in Kit)
Loctite Threadlock
Phillips Head Screwdriver
Flat Head Screwdriver
Utility Knife or Multi Tool
Painter's Tape
1/8" Countersink
3/16" - 7/8" Unibit
1 1/4" - 6 7/8" Auger
105mm (4 1/8") Hole Saw
3/4" X 1 1/4" Grinding stone
Primer & Color Match Paint
Pop Riveter with 3/16" compatible chuck
Various Sockets (Including Drivers, Adaptor and Extensions)
Dorman 10 pcs. 1/2 in. Nylon Push-In Rivet (799-105) (for anything cut or broken on fender lining)

Not pictured here: Pop riveter, countersink and a standard set of tools. Pro-tip: The need for a pop riveter is not written into the instructions. In fact, they refer to self-tapping screws. However, go with the pop-riveter. It works and works very well.
Overview of kitted parts: (In general order of first appearance)
(8) Snorkel Body Studs
(3) 3/16" Pop Rivets
(8) Washers
(8) Nuts
(3) Small Screws (for A-Pillar snorkel neck mount)
(3) Hose Clamps

Here are the washers, rivets, bolts and nuts. Not pictured here are the snorkel body studs.
Pre-work: Snorkel body mounts

Test the studs in the snorkel body before applying Loctite and threading. Make sure the allen key side is facing up.
After removing the screws/clips in fender liner (using a Flathead or clip removal tool), pop the hood and detach air hose with a Phillips Head. Pro-tip: For the Fender Liner, I chose to only remove the the outermost screws/clips, pull out the fender slightly and pull down the liner. It's a bit tighter this way, but it saves a lot of time on the back end.
Remove the pre-filter by loosening the two anchoring hex bolts.
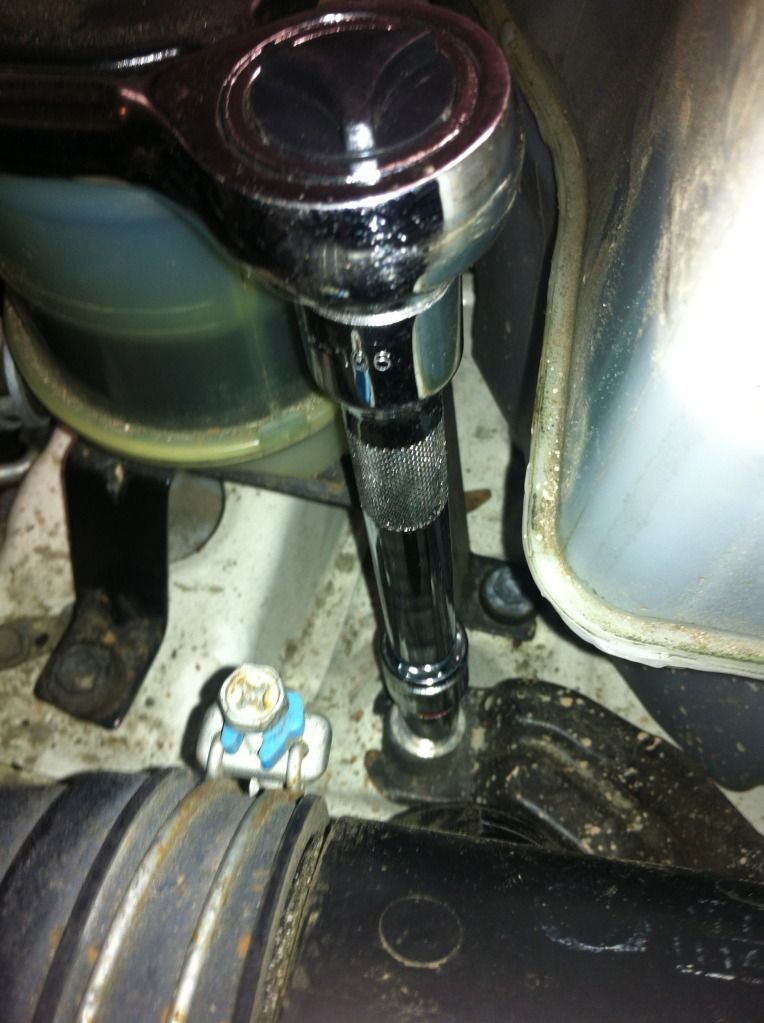
Having an extension here is important.
What's remains is some nice naked space used to jimmy the hard(est) to reach fender clips. This is another big time (and effort) saver.

I then removed the bolts to the OEM air ram with my Phillips head screwdriver.

Seeya later.
Applying and aligning the template was easy; a few simple marks, and now we can drill. Remember to remove the template before drilling and apply painters tape to keep your cut clean from chips. Relax, get one under your belt and you'll feel great about this.

I used the countersink to drill pilots, then used a uni-bit up to 5/8" to get me close to 16mm. Pro-tip: I recommend using a new Uni-bit, Hole Saw and Auger)
One more to go... (this is the big boy)

Go easy, go confidently. Pro-tip: Only apply pressure with the blade already spinning. Bacon grease is a nice, natural lubricant. The Auger should also help prevent the saw from skipping.

Clean up the holes with a grinding stone and DO NOT FORGET TO PRIME AND PAINT to reduce risk of oxidation.

All holes drilled.

Do a dry run mount on the snorkel body after placing painters tape on the A-pillar. Outline the A-Pillar snorkel neck mount on the painters tape

Drill your pilots, remove the tape, and pop-rivet that sucker on. It's sturrrrrdy.

Remount the snorkel body and tighten up the 9 remaining holes by placing a washer and nylon threaded bolt on each. Pro-tip: Use a small ratchet.

Batten down the A-pillar snorkel neck mount that you previously pop riveted with a Phillips Head Screw Driver. Pro-tip: Don't fumble around the side view mirror to get at the securement screws... open the door!

Go back to the pre-filter, remove the coupling and grind down the notches with the stone bit you used to clean up the holes you just drilled in the quarter panel.
Before:
After:

Getting the small end of the snorkel-to-pre-filter bridge on was living hell. It took 4 hands, a blow dryer, a butter knife and pure, unadultered rage. Pro-tip: Find a way to enjoy the rage.
Almost there now... Just feed the bridge through the fender to the snorkel stub. Don't forget to thread it through your silver hose clamps! And be sure to bolt down the pre-filter mounts prior to tightening the hose clamps with the Flat Head. You'll need to tighten those after you're comfortable with the fit. This is done with the Flat Head Screw Driver. The Toyota air hose clamps will take a Phillips Head.

The air ram is the cherry on top. A simple black hose clamp secures this into place. This time, use a Flat Head.

Lastly, you'll need to get the wheel well snapped, clamped and bolted together again. I needed some fresh air and wide open space for this.

And here's the final product:

Hope this helps anyone who's sitting on the fence with PRG.


