Toyota FJ Cruiser Forum banner

Trailing arm mount - how to replace/repair/upgrade?

1 reading
24K views 69 replies 26 participants last post by  Singha  
#1 · (Edited)
Lower control arm bracket - how to replace/repair/upgrade?

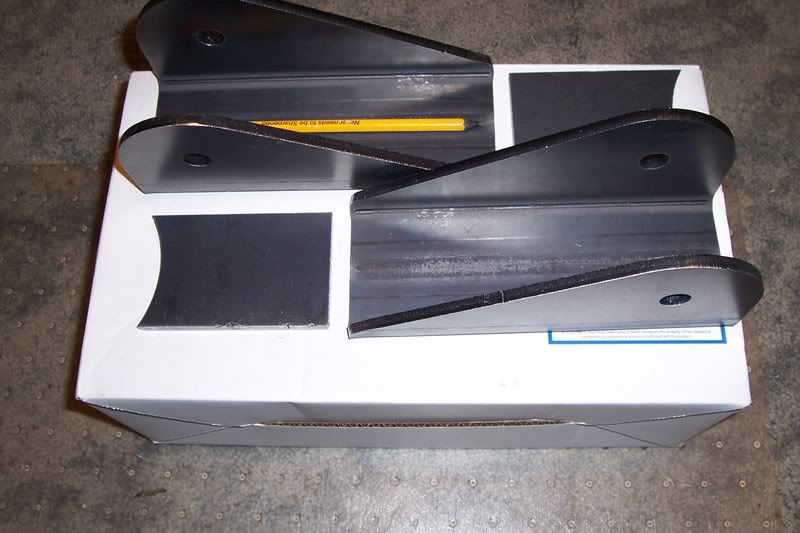
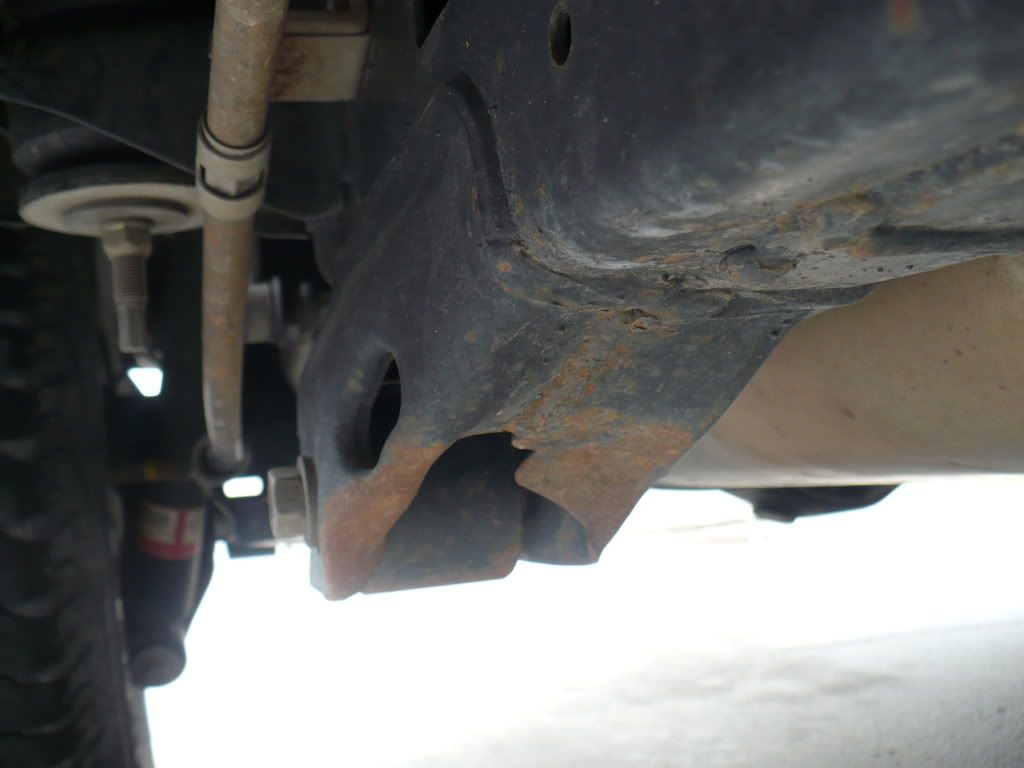
OK so I got a little crazy this memorial day weekend and bent the drivers side trailing arm (lower control arm) mount (bracket). I can deal with the fact that It bent up pretty bad and even the cost of fixing it, but it seems like it will just happen again. I know there are after market trailing arms out there and I think I've seen some after market mounts before, but really don't know much about them. Any recommendations? Is there a way to protect this area? I tried searching, but I'm really not even sure this thing is called the trailing arm mount.

I really want some armor for underneath, but shipping to Alaska makes it cost prohibitive so I'm holding off until my ship goes to the shipyard in Bellingham this fall. I will order it then and just bring it up with me in the spring when the ship is out of the yard. The problem is that I really don't want to stop wheeling until next year so some advice on how to protect these mounts would be helpful. I think I am going to go with some UHMW for summer to help protect the rest of the underbody, this would be a short term solution that should get me through to next year.

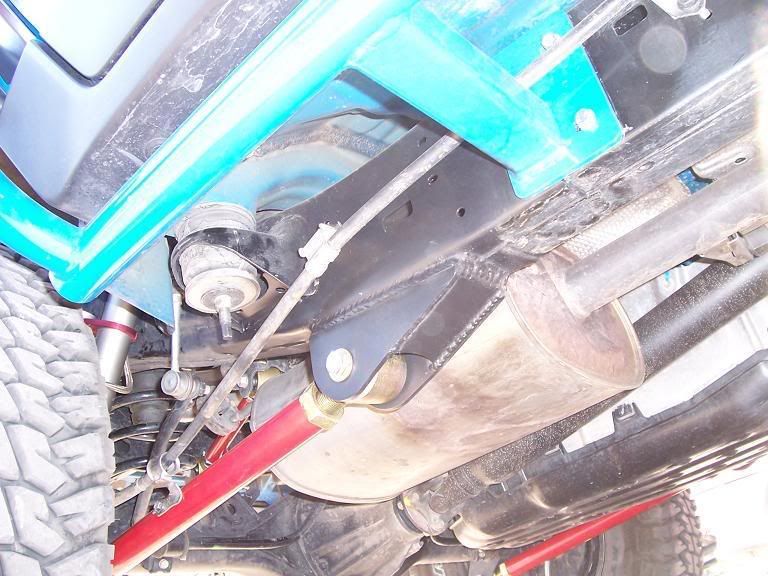
Here's a pic of where it happened and the other 3 are pics of the damage. Interestingly, I really didn't see the damage until I got home and was washing the mud from underneath, but I definitely felt the stiffness in the suspension on the drivers side rear end. At the time I thought the slider had hit, but apparently I was wrong. Live and learn!!
 

Attachments

#2 ·
you can repair it by bending it bak with a crescent wrench, as for armour, allpro offroad sells a bolt on cover or you can get it boxed/reinforced with some stronger metal. check FJollies bugeater build up for an example of the welding and where to do it.
 
#3 ·
whenever I go to All Pro Off Road I get a page load error. FJ-Ollie has an interesting solution though. I'm guessing I could combine that with the body mount chop and kill two birds with one stone. Thanks for the info, what is the real name for this area. it doesn't seem to be trailing arm mount. :D
 
#6 ·
Thanks for the pic. I checked Man-a-Fre's sight and couldn't find the link skids. There seem to be several options for the control arms though. After searching for lower control arm I was able to find many more posts. Just need to learn the lingo I guess. Thanks for everyone's help.
 
#7 ·
i also bent mine up not as bad as you but after i saw the damage i bought the all pro skid link. I believe its still on sale could be wrong though?
 
#8 ·
The metal used to make the frame side capture for these links is quite thin. I don't think it's a good choice of material for the job. I had the All-Pro skid plates on mine and they took plenty of hits. The armor effectively reduced the contact damage, but in the end, it didn't address the mode in which these parts failed.

The vehicle is PHYSICALLY PUSHED FORWARD by the lower links, which are pushed forward by the axle. This is what makes the car move. The force transferred through these parts is tremendous!

Eventually the bolt holes wallow out and become ovals. This leads to a clunking sound in the moments of transition between drive and coast.

I cut the link captures off altogether and replaced them with quarter inch material. The leading edge of this construction is an integrated sloped skid surface.
 
#30 ·
Can you provide a link for your solution for the folks in this thread?

Thanks.
 
#9 · (Edited)
So the real solution would be to have someone cut the old brackets off and replace them with stronger ones that are beveled at the front to help them slide over obstacles. That seems to be the solution FJ-Ollie ended up with also. It doesn't look like it would be that difficult/expensive for a welding shop to do this, so when I get back from work in a couple weeks I may start asking around. I have been meaning to get the body mount chop as well, so hopefully I can find someone willing to do both.

How about the HD adjustable control arms? Are they worth the $$$ or should I just keep the originals until they get bent?
 
#10 ·
How about the HD adjustable control arms? Are they worth the $$$ or should I just keep the originals until they get bent? Man-a-fre offers two types of control arms, the ones that appear to be adjustable and another set that aren't. If I plan on getting a 3" lift in the future, would the adjustable ones be recommended? Pro's and Con's?
Upgraded lower links/trailing arms/whatever are almost a must. seeing the damage you got already you should think about it. If you are going to a welder to take care of the other issues just take your stock links and box them also with two lenghts of L bracket. It'll be cheaper, stronger, and you can run em till the grommets wear out. then you can think about the big bucks for a new set.
 
#12 ·
I'll second everything said here... the All Pro skids are great, but the best possible long term solution is just replacing the horridly thin mounts with something beefier. While you're at it, make it ramp-shaped so they don't get busted again!
 
#13 · (Edited)
Sweet!, I just ordered the link brackets and will definitely look into having some angle iron welded to the stock control arms. Never really though of having them "boxed", but assuming the cost is reasonable it sounds like a great idea. Anyone have any pics of this? I've already saved SonicFJ's pic of the upgraded Link Brackets and a couple pics of the Body Mount Chop to take with me when I go on my hunt for a welder. Any pic's of boxed control arm links would be cool. Although I'm pretty sure It would be easy to get the point across.

FYI,
I ordered the brackets SonicFJ linked to, but it appears they also have a set specifically for the FJ for $36 including spacers. Ramped Rear Link Brackets - $36.00 I may have to call them Monday and cancel the first order and get the FJ specific ones instead.
 
#15 · (Edited)
It kind of looks like he shortened them, but I'm betting the links are pretty close to stock length and he just moved the bracket back a bit to compensate for a lift. 6" perhaps?

After taking a closer look at mine, the brackets seem to be located pretty close to the same place, so maybe his lift is just making things look a bit different.
 
#25 ·
You got it right. I should take a better picture. That shot is from just after installation, and there is a lot of grunge beyond where they cleaned off the frame. I had to go out and look at the rig to see what was going on.

There is nothing in front of the mounts, and they are indeed right in the stock location.
 
#19 ·
They would not.

The All-Pro skids assume the stock geometry of the link capture.

The stock configuration is slightly offset from the frame rail. The stock angle is steeper and shorter. There is a flat on the bottom of the stock part.

The All-Pro part is less than 1/4" thick. Why try to use it on top of quarter inch material?

Mine wrap the plating all the way down the slope and under the rod end.
 
#20 ·
They would not.

The All-Pro skids assume the stock geometry of the link capture.

The stock configuration is slightly offset from the frame rail. The stock angle is steeper and shorter. There is a flat on the bottom of the stock part.

The All-Pro part is less than 1/4" thick. Why try to use it on top of quarter inch material?

Mine wrap the plating all the way down the slope and under the rod end.
Yeah, that's the only reason I wanted them was to cover the rod end.

Thanks Doc.
 
#23 ·
You could just omit the use of that short plate and make one that goes all the way down and around. The sides are still good and the fact that they're already married together and square is a big time saver.

There are a few ways to get plate to bend around that curve. One would be to hammer it to fit before you weld it in. Another would be to weld it part way and then hammer it the rest (less accurate) and finally you could heat it and make it really easy to shape.

Personally, I like hammering. Ask any neighbor within a 2 block radius.
 
#29 · (Edited)
OK, my FJ is in the shop as we speak getting the new brackets installed and the body mounts chopped. I'll post pics when it returns. Hoping it will be as nice a job as SonicFJ's. Should be, the guys who are doing it seem to be pretty good even for jeep guys :D

They seemed a bit concerned with the gas tank on the drivers side bracket so they are going to pull it. Frankly I don't blame them, it's pretty close to that bracket and plastic to boot. SonicFJ, did they pull your tank to install the brackets? If not, how'd they keep things from going BOOM!!!!!!!!!
 
#31 ·
Here's the final bracket. Not quite as clean as SonicFJ's, but not too bad either. For those of you out there planning to do the same thing, there are a couple issues you should know about first. The first and most important is that when you cut away the old bracket, the frame actually is rounded and bends slightly up as it moves to the rear. This means that unless you fill in quite a bit of space, you can't weld the bottom of the new bracket to the frame completely because the bend leaves one end of the bracket about 3/4" away from the frame. The only way around this we could see was to either cut the bracket to fit, cut the bottom out of the bracket or turn it upside down and trim it a bit to give the control link room to pivot. The last option was the one we chose.

The next issue is also kind of important, if you are re-using your original links, the bolts are too short and will only catch about 2/3 of the threads on the nut with the new brackets. Plan on buying longer bolts and or getting upgraded control links with this mod.

They didn't finish the body mount chop, but it should be done soon. The mounts are chopped, but they still need to be boxed.
 

Attachments

#33 ·
Dam. Never thought it happen to me.
Even AP skid couldn't stop it.
My pass side, inner rear buckled in with the help of the AP skid. So now the inner bolts is pointing upward slightly. I took the AP skid off and straighten that out. But my worry now is the LCA not being true/align.
So I am going to replace the link on t e frame with ones posted. I am going to beef up the mounts even further by having a friend weld an addition plate to it and make some skids before having them welded on. So the skid will fit over them much more snug after the mounts are welded onto the frame.

My big question is how to make certain the replacement mount is placed back to spec/true as per original?
 
#34 · (Edited)
I really couldn't answer that, the shop just took a lot of measurements before welding. Everything seems to be ok, but I guess that adjustable links would solve the problem even if they were slightly off. I've asked myself this question as well, but haven't noticed any issues like tire wear of wierd handling, unless you do it yourself I think you pretty much have to trust them to get it right. I think you could go to a shop that does frame work and they might have better equipment to keep things straight, but am not sure.

The stock bolts are too short so you're going to need 14mm x 100mm grade 10.9 metric bolts to replace the stock ones. You might be able to get away with 90mm bolts if you can find them, they didn't have any when I looked so i picked up the 100mm length. I also used grade 10.9 "top lock" nuts which have a slight oval shape at the top to help lock them on. This and loc-tite will hopefully keep them tight, although I'm still a bit paranoid and check them often.

Toyota needs to do something to make these stronger, it's incredibly easy to destroy these brackets.
 
#35 ·
Thanx for that info.

The last two times I put a torque wrench to the nut side and mine where a bit loose, out of curiosity I also put the torque wrench to the bolt side after torquing the nut. And guess what the freaking bolt side needed almost a half turn to get the torque spec. Maybe it was catching on my AP link skids, after that I check the torque on both side.
Just to be safe.

Anyone have a pic of the spacer needed (but is included) to run stock links with these aftermarket beefy mounts? I hope there isn't going to be any problems with my boxed shape AP lower links.

And yeah Toyota if you are listening FIX this dam problem.