I had garage day today with my FJ. I installed a lift kit, and replaced a couple idler pulleys, and fixed my starter. I searched for starter stuff beforehand on this forum and couldn't find much, so I thought I'd do my own little write-up for everyone.
The problem I had was that it would click but it didn't always turn over. I could keep clicking it till it finally did so I never got stranded, but I knew it needed attention. As I mentioned in another thread, I took my FJ to the dealer for this. They didn't want to repair it under warrenty because there was "evidence of mud". Yeah I know what your thinking, but I'll stay on subject for now.
![Image]()
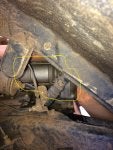
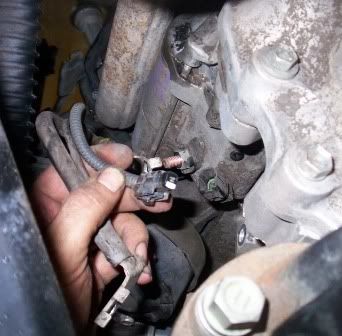
The FJ's starter is mounted with two 17mm bolts going through the tranny into the starter. The top one was a real PITA, I had to use a cheater pipe over my socket wrench, and could only get a couple clicks a turn.
The main terminal and igniton plug weren't corroded and came off easy. There's heavy ground wire right next to the starter. I took that off to because it was on the same harness.
I've replaced a starter in almost every vehicle I've owned, and every time I've pulled it out from the bottom. Well, I can save you a 1/2 hour of time, frustration, and skinned knuckles by telling you this one needs to come out from above. I unbolted two 10mm screws to make room, one was the front differential breather caps, the other for a little metal flap that serves some silly unknown purpose. These screws were easier than the next viable option, and that would have been to disconnect the forward driveshaft.
![Image]()
I bought a starter for a 2007 tacoma, thinking it would be the same as the FJ's. it was only $130 at Autozone, compared to the $340 that the dealer wanted. Maybe they mistakenly gave me the V4 starter though, because it wasn't quite the same. The mounting holes were 10.5cm apart instead of 11.5cm (measured from center of hole) and the spindle had 9 teeth instead of the original's 10.
![Image]()
![Image]()
Anyhow, I'll save money by taking it back because I fixed the old one. The starter has two little rubber nipples over breather holes. the one nipple by the solenoid got flooded with mud, and dirtied the contacts. Time for a new scuba driver project- snorkel for the starter! :thinkerg:
![Image]()
The solenoid operates with a round magnetic cylinder that has a washer-shaped terminal to connect the ciruit. Inside the front cover, this peice comes out easy without spilling out tiny parts. In my case, the contacts were very dirty, and there was a little corrosion from a short caused by the mud. I'm glad I found this, because it was draining the battery.
![Image]()
I cleaned the insides up with a tiny scraper, a small brass brush, and several q-tips to reach deeper inside. Compressed air would have been helpful too. I put a tiny bit of grease in the cylinder, I wanted to termals to stay clean.
![Image]()
I knocked off one of my little rubber nipples too. It confused me at first, I thought it squeezed into its hole. Instead I just had to pull out this little plastic clip with needlenoses and push the clip inside the nipple. I thought it'd be good to show this in case anyone knocks one off while it's in the car.
![Image]()
![Image]()
Well that's that. It went in easier than it came out and starts fine.
I'll write up my lift job later in another section.
-John.
The problem I had was that it would click but it didn't always turn over. I could keep clicking it till it finally did so I never got stranded, but I knew it needed attention. As I mentioned in another thread, I took my FJ to the dealer for this. They didn't want to repair it under warrenty because there was "evidence of mud". Yeah I know what your thinking, but I'll stay on subject for now.
The FJ's starter is mounted with two 17mm bolts going through the tranny into the starter. The top one was a real PITA, I had to use a cheater pipe over my socket wrench, and could only get a couple clicks a turn.
The main terminal and igniton plug weren't corroded and came off easy. There's heavy ground wire right next to the starter. I took that off to because it was on the same harness.
I've replaced a starter in almost every vehicle I've owned, and every time I've pulled it out from the bottom. Well, I can save you a 1/2 hour of time, frustration, and skinned knuckles by telling you this one needs to come out from above. I unbolted two 10mm screws to make room, one was the front differential breather caps, the other for a little metal flap that serves some silly unknown purpose. These screws were easier than the next viable option, and that would have been to disconnect the forward driveshaft.
I bought a starter for a 2007 tacoma, thinking it would be the same as the FJ's. it was only $130 at Autozone, compared to the $340 that the dealer wanted. Maybe they mistakenly gave me the V4 starter though, because it wasn't quite the same. The mounting holes were 10.5cm apart instead of 11.5cm (measured from center of hole) and the spindle had 9 teeth instead of the original's 10.


Anyhow, I'll save money by taking it back because I fixed the old one. The starter has two little rubber nipples over breather holes. the one nipple by the solenoid got flooded with mud, and dirtied the contacts. Time for a new scuba driver project- snorkel for the starter! :thinkerg:

The solenoid operates with a round magnetic cylinder that has a washer-shaped terminal to connect the ciruit. Inside the front cover, this peice comes out easy without spilling out tiny parts. In my case, the contacts were very dirty, and there was a little corrosion from a short caused by the mud. I'm glad I found this, because it was draining the battery.

I cleaned the insides up with a tiny scraper, a small brass brush, and several q-tips to reach deeper inside. Compressed air would have been helpful too. I put a tiny bit of grease in the cylinder, I wanted to termals to stay clean.

I knocked off one of my little rubber nipples too. It confused me at first, I thought it squeezed into its hole. Instead I just had to pull out this little plastic clip with needlenoses and push the clip inside the nipple. I thought it'd be good to show this in case anyone knocks one off while it's in the car.


Well that's that. It went in easier than it came out and starts fine.
I'll write up my lift job later in another section.
-John.