

To read the original full thread and post questions/comments on this topic, please go to http://www.fjcruiserforums.com/forums/stereo-electronics/52990-12-circuit-switched-fuse-block.html
![Image]()
As my collection of after-market accessories began to grow (GPS, CB, XM radio, Off-road lights, spotlights, flashlight charger, etc.), I quickly started running out of power sources to which to connect them.
It didn't take long for my OEM interior fuse box to start looking like a rat's nest of Add-A-Circuits and daisy-chained fuses.
And, I'm sure I'm not the only one who's familiar with this scary sight. :scared: :scared:
![Image]()
So, I decided to consolidate all of my gadgets into a single fuse block. Not simply one that was capable of powering multiple devices, but also one that would automatically turn off and on along with the FJ itself. (I've had too many CB radios and off-road lights suck the power out of my battery after turning off my truck and forgetting to turn off everything else. )
)
Based upon the recommendation of several others on the forum, I went with a Blue Sea marine auxiliary fuse block. Matter of fact, Shadow-Warrior has an excellent write-up on the 6 circuit version of the Blue Sea fuse block: http://www.fjcruiserforums.com/foru...ums/stereo-electronics/27954-clean-12v-fuse-block-accessory-install-w-pics.html
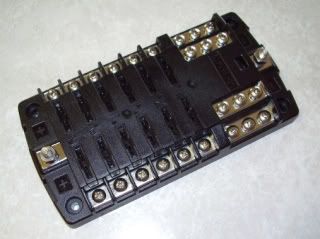
Since I had already outgrown their popular 6-circuit unit, I shelled out the extra $15 to go with the 12-circuit model. I bought mine from a local marine/boat supply store, however, they're easy to find on-line. Blue Sea Systems 5026 Screw Terminal Blade Fuse Block (12 Circuit ATO/ATC w/ Negative Bus)
![Image]()
To activate the Blue Sea fuse block into the on and off mode in conjunction with the ignition of my FJ, I elected to use a relay system that would be triggered by a single OEM switched circuit. Thus drawing power directly from my FJ's battery, but only interrupted by the deactivated relay.
Knowing that a total of 12 combined circuits might be too big of a draw for a single relay, I elected to create two separate primary busses on the Blue Sea unit of 6 circuits each . . . . triggered by two separate 40 amp automotive relays.
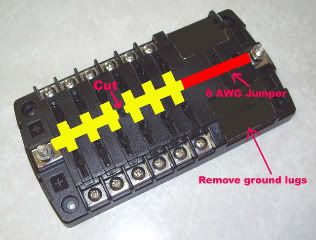
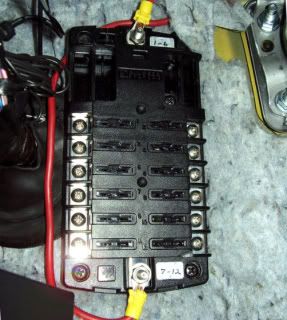
The Blue Sea 12 circuit model can be opened from the rear of the unit, and the common buss bar can be cut between the top 6 fuse circuits and the bottom 6 circuits.
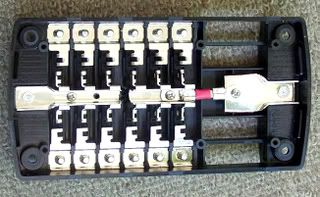
The lower 6 remained hard-connected to the primary Positive (+) terminal post. And, I hard-connected the top 6 to what was previously a Negative (-) terminal post, which isn't needed in this installation. (I also removed all of the convenience ground lugs from the fuse block.
![Image]()
![Image]()
Here are the parts you'll need for the installation:
Blue Sea 12 Circuit fuse block (model 5026) - @$40
20' of 8 gauge (8 AWG) automotive wire - @$5
30'-40' of 12-14 gauge (12/14 AWG) automotive wire - @$15-$20
(2) 40 amp 12V automotive relays - $5 each
(2) 40 amp 12V automotive circuit breakers - @$8 each
Standard size 12V automotive blade-type fuses (not mini-fuses)
Crimp connectors
Cable ties
Here are the tools that you'll need:
Screwdriver(s)
Electric drill w/ bits
Nut driver(s)
Crimping tool
Wire stripper
Diagonal wire cutters
Circuit testing instrument - Volt-Ohm meter or continuity tester
Misc. mounting screws / nuts & bolts
NOTE: Before mounting and wiring the Blue Sea fuse block and all of your respective accessories, disconnect the Negative (-) battery cable from your FJ's battery for obvious safety reasons.
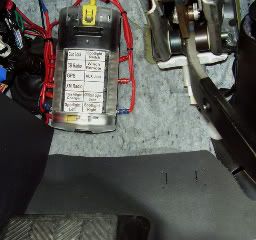
I mounted the fuse block on the interior side of the firewall, approximately 8 inches above the left driver side foot rest. 4 holes were drilled though the firewall for mounting screws.
NOTE: When positioning the fuse block for mounting, first locate the grommeted hole in the firewall which leads into the engine compartment. This hole will be used to feed your primary power wires from the Blue Sea unit to the FJ's battery (via the relays). Mount the fuse block so that clearance to this particular hole can be obtained.
![Image]()
Once you have made your connections to the two terminal posts (which are now both Positive (+) ) on the fuse block, feed the two 8 AWG wires through the firewall hole into the engine compartment.
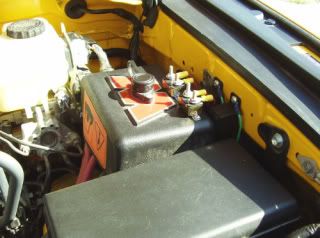
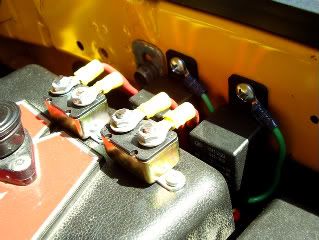
It's from here that you'll be connecting these two wires to two separate 40 amp relays, which I decided to mount on the inside ridge of my inner fender well.
![Image]()
![Image]()
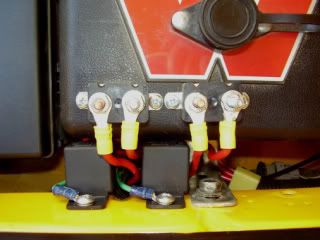
To provide additional protection between the battery and the relays (and the overall circuit), a 40 amp automotive circuit breaker was wired in-line before each relay from the battery.
![Image]()
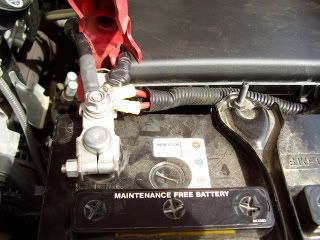
And, to complete the connection to the battery itself, two separate 8 AWG wires were routed from the circuit breakers to the battery.
![Image]()
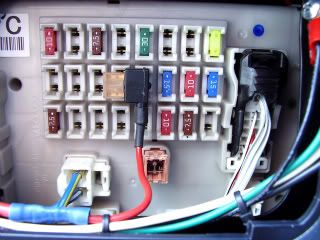
To trigger both relays to the "On" position when the FJ is started, a trigger signal is sent from a lone switched (unused) circuit inside of the interior OEM fuse box. An Add-A-Circuit provided the actual connection, even though this particular circuit is not shared with any other device on the FJ.
(Depending on the optional accessories your FJ came with, you might have to locate a vacant "switched" circuit/fuse socket with a volt-ohm meter or a continuity test light. My vacant one happened to be in the middle row, fifth one over from the far left.)
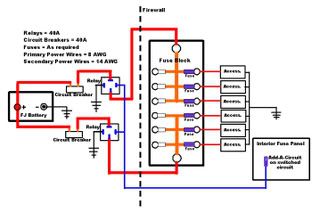
Here's a wiring diagram I created of the entire fuse block configuration. (For simplicity sake, I only showed the right 6 circuits connected to accessories. However, all 12 are available for use.)
![Image]()
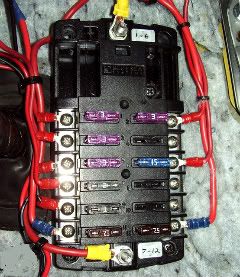
Once all of the under-the-hood connections have been made, you can start routing power cables from your various accessories and make the necessary connections to the fuse block. (Also, make ground connections for each individual accessory.) And, tidy everything up with cable ties as necessary.
![Image]()
At this time, you can also plug in the proper fuses for each component.
For a list of proper fuse amperages for the variety of different 12 volt automotive accessories, see doublejfj's Technical Article http://www.fjcruiserforums.com/foru...r-technical-articles/50792-fuses-12-volt-electrical-current-complete-guide.html
Upon completion, re-connect the battery's Negative (-) battery cable, and start your FJ to test the new fuse block system.
With the engine on, power received at the "switched" circuit in the OEM fuse box will send a "power on" signal to the two relays under the hood. These two relays, when activated, will provide 12 volt power to both power busses of the Blue Sea fuse block.
Turning the engine off will turn off all of your connected accessories, thus eliminating the accidentally-left-on culprit that will quickly drain your battery if forgotten about and left unattended.
Now you can rejoice in the clean-up job that you did in your interior's OEM fuse box, and return those 6-8 Add-A-Circuits back to your supply tray.
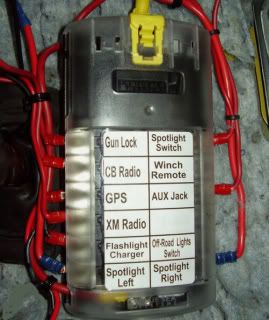
![Image]()
An Avery mailing label made for a perfect fuse identification label for the cover on the Blue Sea fuse block.
![Image]()
And, now the peace of mind comes knowing that you not only have a safe and efficient centralized power source for all of your FJ's electrical toys, but you'll also be able to sleep in in the morning . . . . not having to get up early to jump-start your FJ.
As my collection of after-market accessories began to grow (GPS, CB, XM radio, Off-road lights, spotlights, flashlight charger, etc.), I quickly started running out of power sources to which to connect them.
It didn't take long for my OEM interior fuse box to start looking like a rat's nest of Add-A-Circuits and daisy-chained fuses.
And, I'm sure I'm not the only one who's familiar with this scary sight. :scared: :scared:

So, I decided to consolidate all of my gadgets into a single fuse block. Not simply one that was capable of powering multiple devices, but also one that would automatically turn off and on along with the FJ itself. (I've had too many CB radios and off-road lights suck the power out of my battery after turning off my truck and forgetting to turn off everything else.
)Based upon the recommendation of several others on the forum, I went with a Blue Sea marine auxiliary fuse block. Matter of fact, Shadow-Warrior has an excellent write-up on the 6 circuit version of the Blue Sea fuse block: http://www.fjcruiserforums.com/foru...ums/stereo-electronics/27954-clean-12v-fuse-block-accessory-install-w-pics.html
Since I had already outgrown their popular 6-circuit unit, I shelled out the extra $15 to go with the 12-circuit model. I bought mine from a local marine/boat supply store, however, they're easy to find on-line. Blue Sea Systems 5026 Screw Terminal Blade Fuse Block (12 Circuit ATO/ATC w/ Negative Bus)
To activate the Blue Sea fuse block into the on and off mode in conjunction with the ignition of my FJ, I elected to use a relay system that would be triggered by a single OEM switched circuit. Thus drawing power directly from my FJ's battery, but only interrupted by the deactivated relay.
Knowing that a total of 12 combined circuits might be too big of a draw for a single relay, I elected to create two separate primary busses on the Blue Sea unit of 6 circuits each . . . . triggered by two separate 40 amp automotive relays.
The Blue Sea 12 circuit model can be opened from the rear of the unit, and the common buss bar can be cut between the top 6 fuse circuits and the bottom 6 circuits.
The lower 6 remained hard-connected to the primary Positive (+) terminal post. And, I hard-connected the top 6 to what was previously a Negative (-) terminal post, which isn't needed in this installation. (I also removed all of the convenience ground lugs from the fuse block.
Here are the parts you'll need for the installation:
Blue Sea 12 Circuit fuse block (model 5026) - @$40
20' of 8 gauge (8 AWG) automotive wire - @$5
30'-40' of 12-14 gauge (12/14 AWG) automotive wire - @$15-$20
(2) 40 amp 12V automotive relays - $5 each
(2) 40 amp 12V automotive circuit breakers - @$8 each
Standard size 12V automotive blade-type fuses (not mini-fuses)
Crimp connectors
Cable ties
Here are the tools that you'll need:
Screwdriver(s)
Electric drill w/ bits
Nut driver(s)
Crimping tool
Wire stripper
Diagonal wire cutters
Circuit testing instrument - Volt-Ohm meter or continuity tester
Misc. mounting screws / nuts & bolts
NOTE: Before mounting and wiring the Blue Sea fuse block and all of your respective accessories, disconnect the Negative (-) battery cable from your FJ's battery for obvious safety reasons.
I mounted the fuse block on the interior side of the firewall, approximately 8 inches above the left driver side foot rest. 4 holes were drilled though the firewall for mounting screws.
NOTE: When positioning the fuse block for mounting, first locate the grommeted hole in the firewall which leads into the engine compartment. This hole will be used to feed your primary power wires from the Blue Sea unit to the FJ's battery (via the relays). Mount the fuse block so that clearance to this particular hole can be obtained.
Once you have made your connections to the two terminal posts (which are now both Positive (+) ) on the fuse block, feed the two 8 AWG wires through the firewall hole into the engine compartment.
It's from here that you'll be connecting these two wires to two separate 40 amp relays, which I decided to mount on the inside ridge of my inner fender well.
To provide additional protection between the battery and the relays (and the overall circuit), a 40 amp automotive circuit breaker was wired in-line before each relay from the battery.
And, to complete the connection to the battery itself, two separate 8 AWG wires were routed from the circuit breakers to the battery.
To trigger both relays to the "On" position when the FJ is started, a trigger signal is sent from a lone switched (unused) circuit inside of the interior OEM fuse box. An Add-A-Circuit provided the actual connection, even though this particular circuit is not shared with any other device on the FJ.
(Depending on the optional accessories your FJ came with, you might have to locate a vacant "switched" circuit/fuse socket with a volt-ohm meter or a continuity test light. My vacant one happened to be in the middle row, fifth one over from the far left.)
Here's a wiring diagram I created of the entire fuse block configuration. (For simplicity sake, I only showed the right 6 circuits connected to accessories. However, all 12 are available for use.)
Once all of the under-the-hood connections have been made, you can start routing power cables from your various accessories and make the necessary connections to the fuse block. (Also, make ground connections for each individual accessory.) And, tidy everything up with cable ties as necessary.
At this time, you can also plug in the proper fuses for each component.
For a list of proper fuse amperages for the variety of different 12 volt automotive accessories, see doublejfj's Technical Article http://www.fjcruiserforums.com/foru...r-technical-articles/50792-fuses-12-volt-electrical-current-complete-guide.html
Upon completion, re-connect the battery's Negative (-) battery cable, and start your FJ to test the new fuse block system.
With the engine on, power received at the "switched" circuit in the OEM fuse box will send a "power on" signal to the two relays under the hood. These two relays, when activated, will provide 12 volt power to both power busses of the Blue Sea fuse block.
Turning the engine off will turn off all of your connected accessories, thus eliminating the accidentally-left-on culprit that will quickly drain your battery if forgotten about and left unattended.
Now you can rejoice in the clean-up job that you did in your interior's OEM fuse box, and return those 6-8 Add-A-Circuits back to your supply tray.
An Avery mailing label made for a perfect fuse identification label for the cover on the Blue Sea fuse block.
And, now the peace of mind comes knowing that you not only have a safe and efficient centralized power source for all of your FJ's electrical toys, but you'll also be able to sleep in in the morning . . . . not having to get up early to jump-start your FJ.


