Ok, first I don’t like to tap into existing electrical components in my vehicles, I like to run their on wiring. I went to West Marine and bought a “ST Blade Fuse Block” It takes the small blade fuses, it also has (6) accessory you can run off it. I like because it is marine quality, the automotive fuse blocks are kind of rinky dink IMO. Then I bought 12’ of 10 Gauge wire for running straight from the battery to the fuse box. I didn’t know at the time where I wanted to put the box at inside the vehicle, this is why I bought 12’.
![Image]()
![Image]()
I first ran the 10 gauge red positive wire from the battery along the fender wall, then ran the 10 gauge black neg wire from the fender wall. I used black colored small cable ties to keep them bundled together. Next I used an existing rubber firewall plug, made a small hole, then pushed both wires through into the cabin area. I then pulled the rest of the slack into the cabin, leaving very little slack in the engine bay area. I had bought some automotive wire protective sleeve material; I used it to wrap the wires together to make it look like all the other wires that are run in the engine bay, it makes for a very clean appearance.
![Image]()
![Image]()
![Image]()
I decided in the end the best place for the fuse block was under the driver’s side dash off the firewall. I noticed when looking under there that off the Brake Bracket has (2) bolts that protruded out with enough thread for some nuts to be tightened on. I decided that this would be the best location for the box, but I would have to make a bracket for the box to hang off the brake bracket.
![Image]()
I then measured the distance between the two bolts; it came to 2-1/2 inches. I then drew a template up and cut it out, placed it inside holding up next to the bolts, it was going to work great. I had some 16 gauge steel that I bought for making a CB mount, I had some of this material left, so used it for the fuse bracket. I traced it on to the steel, then cut it out with a cutoff wheel on my hand held grinder. Then took over to the belt sander, smoothing the edges out. Next, I measured the fuse box mounting screw locations. I marked these on the steel and then took it over to my drill press, drilled four small holes where the box is going to mount. I then drilled (2) 5/16” holes for the mounting to the steering box. I test fitted the bracket, it worked great, I then painted it gray set to dry.
![Image]()
![Image]()
Next I mounted the fuse block to the bracket and then mounted the bracket to the brake bracket using (2) 5/16” locknuts.
![Image]()
![Image]()
![Image]()
![Image]()
![Image]()
Next I finished it off by cutting the excess wire off to the desired length, crimped elect connectors on the ends of both wires, then hooked them up, then placed the fuse block cover on. Now I have (6) open areas to run what ever I want inside with fuses. I just finished making a real clean CB mount which attaches under the center console using the existing bolt from the sensor and one from the shift box. It comes out underneath the side of the console and attaches to my large Cobra 148 NW ST Sound Tracker Single Sideband CB. I also run a police scanner and some other 12-volt items. This will give me room to grow, without the hassle of finding hot wires, and ground locations, plus having everything in one place if a fuse blows. Just thought I would pass it on to anyone that might to do something like this too.
When doing any elec work, remove the Neg from the battery.
Side note: I will be installing a 125A fuse between the Battery & Fuse Block.
****************UPDATE******************
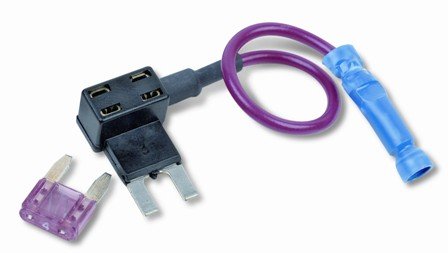
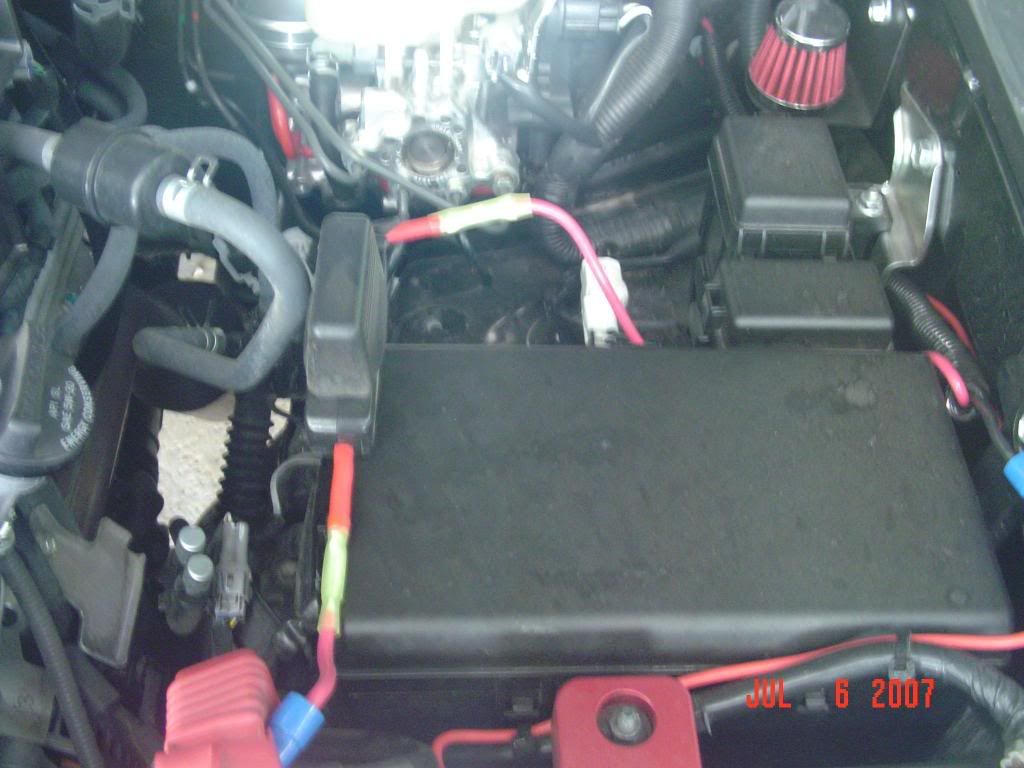
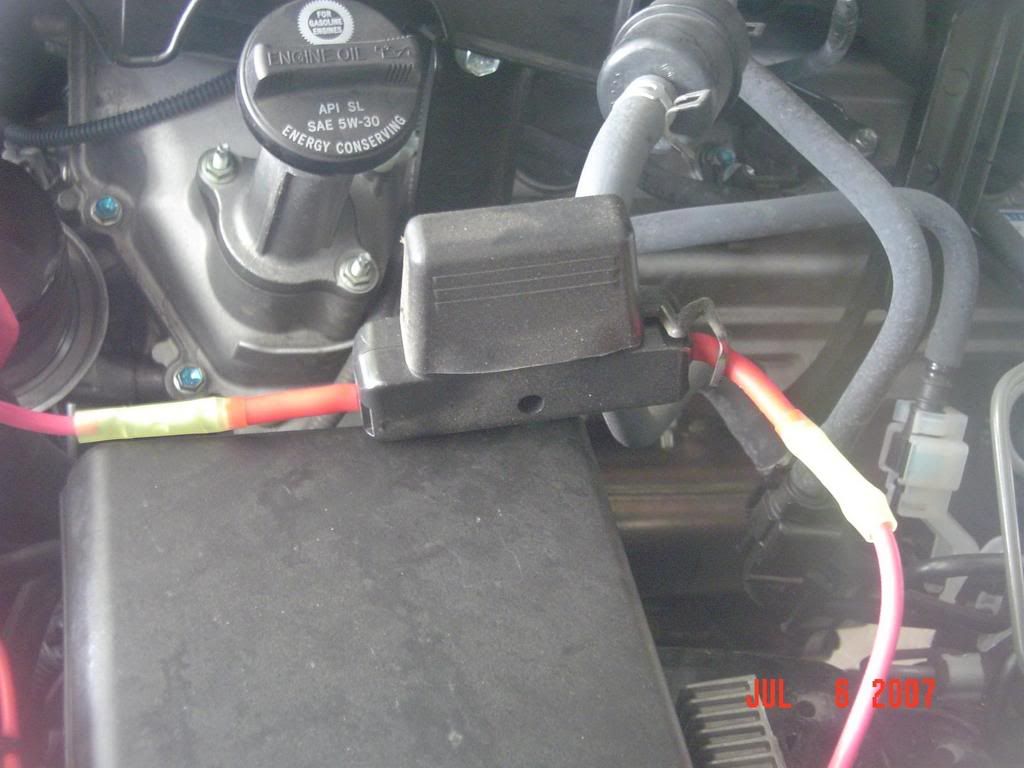
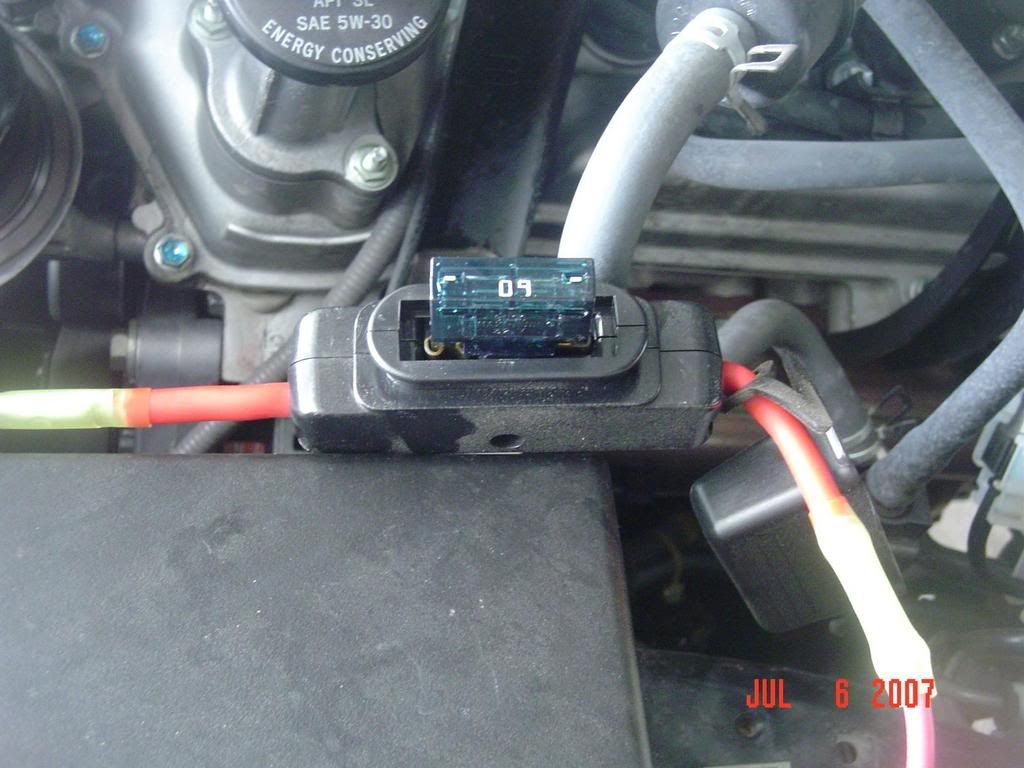
I have installed an inline 60 amp Fuse between the Battery & Fuse Block. This will help insure of any High amperage short to the fuse block inside the cabin. The Fuse block said to install 125 amp fuse. I tried finding one without ordering online, and found the largest I could find locally was a 60amp inline fuse. A 125 amp has to be huge, I think a little over kill myself. I went with the 60amp, it should suffice. The following are some pics of the inline fuse installed for everyone. I installed it a while back and told everyone that I would update the thread when finished. Sorry for the delay, I took some pic's this morning.
![Image]()
![Image]()
![Image]()
I hope this helps everyone


I first ran the 10 gauge red positive wire from the battery along the fender wall, then ran the 10 gauge black neg wire from the fender wall. I used black colored small cable ties to keep them bundled together. Next I used an existing rubber firewall plug, made a small hole, then pushed both wires through into the cabin area. I then pulled the rest of the slack into the cabin, leaving very little slack in the engine bay area. I had bought some automotive wire protective sleeve material; I used it to wrap the wires together to make it look like all the other wires that are run in the engine bay, it makes for a very clean appearance.


I decided in the end the best place for the fuse block was under the driver’s side dash off the firewall. I noticed when looking under there that off the Brake Bracket has (2) bolts that protruded out with enough thread for some nuts to be tightened on. I decided that this would be the best location for the box, but I would have to make a bracket for the box to hang off the brake bracket.

I then measured the distance between the two bolts; it came to 2-1/2 inches. I then drew a template up and cut it out, placed it inside holding up next to the bolts, it was going to work great. I had some 16 gauge steel that I bought for making a CB mount, I had some of this material left, so used it for the fuse bracket. I traced it on to the steel, then cut it out with a cutoff wheel on my hand held grinder. Then took over to the belt sander, smoothing the edges out. Next, I measured the fuse box mounting screw locations. I marked these on the steel and then took it over to my drill press, drilled four small holes where the box is going to mount. I then drilled (2) 5/16” holes for the mounting to the steering box. I test fitted the bracket, it worked great, I then painted it gray set to dry.


Next I mounted the fuse block to the bracket and then mounted the bracket to the brake bracket using (2) 5/16” locknuts.


Next I finished it off by cutting the excess wire off to the desired length, crimped elect connectors on the ends of both wires, then hooked them up, then placed the fuse block cover on. Now I have (6) open areas to run what ever I want inside with fuses. I just finished making a real clean CB mount which attaches under the center console using the existing bolt from the sensor and one from the shift box. It comes out underneath the side of the console and attaches to my large Cobra 148 NW ST Sound Tracker Single Sideband CB. I also run a police scanner and some other 12-volt items. This will give me room to grow, without the hassle of finding hot wires, and ground locations, plus having everything in one place if a fuse blows. Just thought I would pass it on to anyone that might to do something like this too.
When doing any elec work, remove the Neg from the battery.
Side note: I will be installing a 125A fuse between the Battery & Fuse Block.
****************UPDATE******************
I have installed an inline 60 amp Fuse between the Battery & Fuse Block. This will help insure of any High amperage short to the fuse block inside the cabin. The Fuse block said to install 125 amp fuse. I tried finding one without ordering online, and found the largest I could find locally was a 60amp inline fuse. A 125 amp has to be huge, I think a little over kill myself. I went with the 60amp, it should suffice. The following are some pics of the inline fuse installed for everyone. I installed it a while back and told everyone that I would update the thread when finished. Sorry for the delay, I took some pic's this morning.
I hope this helps everyone