***UPDATED*** 4/28/2014***
Ok so I’ve started another build thread partly because the first one stunk and I couldn’t post pictures…
Chances are this one will suck too but oh well- it’s your life to waste looking :lol:
If you like what you see, post a thought at the end. If you dont like what you see....post a thought on Wikids build thread... If you have any cool stickers... send them to me.
http://www.fjcruiserforums.com/foru...ld-ups/110476-my-2010-yeti-warmest-white-beast-outside-himalayan-mountains.html
So here’s my second shot at this…


Current modifications:
Suspension/ Steering-
Front-
All Pro +2” Long Travel (UCA/ LCA)
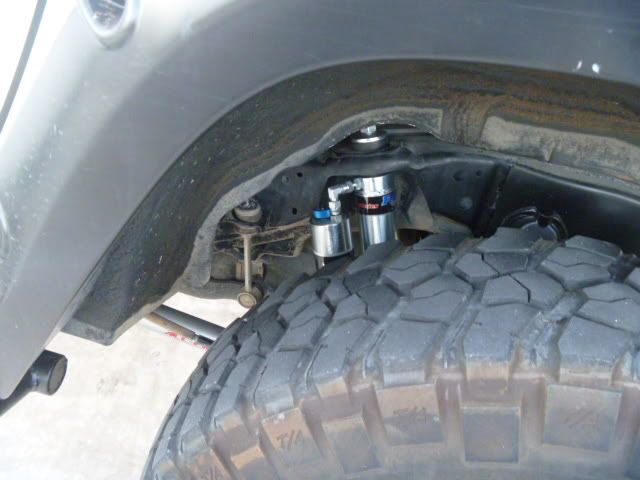
2.5” Fox Coilovers w/ external reservoirs
Timbren Bump stops
All Pro Spindle Gussets
Total Chaos Tower Gussets
Total Chaos Cam Gussets
Currie +2” CrMo Axles
All Pro HD Steering system
SS extended brake lines
Rear-
Custom Metal Tech Long Travel
ICON Omega Twin Tube Bypass- Custom lengthened for LT set up
Light Racing Jounce Shocks with custom welded spacers
Metal Tech Long Travel Springs
Day Star 1.5" Spring Spacer
Metal Tech 3" Bump Drop spacers
Timbren Bump stops- modified
All Pro HD Upper Links (Control Arms)
Metal Tech Offset Lower Links (Control Arms)
SS extended brake lines
Wheels/ tires/ accessories
17” x 8.5” Trail Ready HD Bead Locks with Blue anodized World Series Rock Rings (w/ double rock ring spacers)- Posts 127 and 262
35” x 12.5” 17R Pitbull Rockers (Tennis ball, golf ball and airsoft pellet balanced)- posts 127, 195 & 262
Spidertrax 1.25” Spacer- Rear only
Gorilla Wheel locks (12mm x 1.5” acorn)- post 483
ARB Airdown tool
Powertank 10lbs CO2 tank- Custom Smoked Bronze w/ upgraded Nitrogen gauges, hose and bag
Powertank Air chuck w/ oil filled Gauge
ARB Compressor (See TC / Gearing)
Transfer Case/ Gearing
Marlin "Lefty" with 30 Spline CroMo Output shafts (Front and Rear), 23 Spline Competition 4.7.1 Gears and 4.0 Inchworm Adapter Plate. Installed with Tummy Tuck package- 4" additional break over clearance.- Posts- 970, 996 & 1000
Nitro 4.56.1 Gears (Front and Rear)
8" ARB Air Locker- RD121 for 8" IFS Clamshell
ARB Compressor- Hi-output- CKMA12- 12 Volt w/ 2 Gallon reserve tank- Air lines plumbed to both front and rear bumpers with quick connects (also used to activate locker)- Post 1062
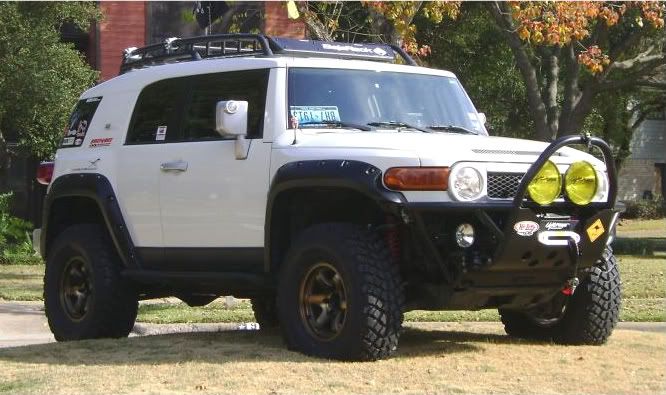
Armor/ Exterior
Front Bumper- Custom Rocktek w/ stinger
Rear Bumper- LoD with Tire Swing out- includes Hi-Lift mount, RotoPax mounts and tray- Posts- 534, 537 & 545
Briareos Bumper Mod
Bud Built 5 piece "Tummy Tuck" skids- PC Hammertone Grey
Bud Built Rear Differential Skid- PC Hammertone Grey- post 483
All Pro APEX DOM Kick-Out Sliders- Won from All Pro-Yea!!
Rocktec Upper link armor
Outrider Lower link armor
FJToyman Shock armor- compliments of Joe!
Aero Light Guards
Kill Helmet!- post-115
Plastic fender removal
Pinch weld "correction"
BMC
Threadworkz Custom CB antenna Flags (Toyeti & Punisher)
Lighting
1- 40" Rigid E-Series light Bar w/ custom roof rack delete mount (not installed)
1 Pair- Lightforce Blitz 240’s with yellow/ clear lens covers/diffusers spot/flood combo beam
1 Pair- Scoprion-LED 109 watt LED (5”)- flood beam- Post 392, 417 and 504
1- Scorpion-LED 12 degree Spot light (Prototype)- Cyclops
1 Pair- Rigid Dually D2’s- euro beam- Post 417 and 504
1 Pair- PIAA LP530- LED lights in rear bumper
LA Trail Teams 10- Side Mirror Light Mod- Amber LED-Thanks Erick!
Recovery
Pathfinder 9000 lbs non integrated winch
Warn Industries Winch selonoid shut off w/ remote switch
50’ Viking 3/8” Amstell Blue Synthetic winch line with safety thimble and rubber protector
Demello Offroad Black aluminum Fairlead- Custom Fatty
48” Hi-Lift Extreme
Hi-Lift Base
Rocktek Hi-Lift/ Slider adaptor
Bushranger X-Jack (AKA- The Orange Marshmallow)
ARB Premium Recovery (9000 Snatch block, Snatch strap, Tree saver, Winch extension, Shackles, winch line isolator and gloves)
Wheel chocks
Tool Bag- various hand/ airtools
Milwaukee ½” cordless impact gun
RotoPax 4 x 2 Gallon gas cans
(2) Trail Spare +2” CV's
Additional Shackles
Sound system- 17 speakers
Pioneer AVH- P8400BH head unit
JL Audio XD600/6 600watt x 6 amplifier
JL Audio XD500/3 100watt x 2/ 300watt x 1 amplifier
JL Audio remote level controller
6 x 9" Focal Access 690 CA1 SG's 2-Way Coaxial speakers (Door)
TacoTunes 6 x 9" Speaker door mounts
3 1/2" Infinity Reference 3002CFX 2-Way Coaxial speakers- (Dash)
4" Focal Polyglass 100CVX 2-Way Coaxial speakers (Rear Pods)
4" VersaPod enclosures
3 1/2" Polk Audio DXi350 2-Way Coaxial speakers (Rear Pillar)
10" JL Audio 10TW3 Slimline Sub woofer
SubThump FJ Cruiser subwoofer enclosure
KnuKonceptz Kolossus Flex Kable 0 gauge OFC wire-main
Kicker 4 gauge OFC wire- to amps and ground
100 amp AGU Fuses/ 50 amp MAXI fuses
12 gauge Monster speaker wire throughout- soldered connections
JL Audio power distribution block and Battery mount
Dynomat Xtreme Light- 20 sq ft- front doors
Fat Mat sound insulator- 100 sq/ft- floor/ walls/ remaining doors
Communication/ Audio
Cobra LX 29 Limited Edition -Post- 537
Astatic Noise Cancelling Microphone
4’ Firestik FS4 antenna
Firestik SS Spring
Quik-Disconnect
Bandi Mount
Astatic PDC1 SWR meter
Panasonic Toughbook CF-18 w/ GPS Trackmaker & Verizon 4G Mobil broadband
Wilson 801212 Dual Band Car Cell Phone Booster Antenna
Garmin Nuvi 500- Offroad GPS
Banks IQ - OBD2 controller/ scanner
Engine/ Electric Other
TRD Drop-in filter
Megan SS catback exhaust- post 309
Dirty Parts Dual Battery Kit w/ Odyssey PC2150 battery and Sears Platinum Battery w/ Lots of booger weldz- post 505
Blue Sea Systems 3000HD battery switch/ single circuit On/Off- 600 amp continuous
2 gauge OFC w/ copper connectors- crimped and soldered- upgrade to factory alternator/ ground system
Blue Sea HD Series Battery Switch- rated at 600 amps continuos
Lots of stickers
Interior
PRP Podium Racing seats- post- 485, 492 & 504
Metal Tech PRP seat brackets w/ SRS delete switch Post 492, 504 & 537
Ellis Precision shifter handle- Stealth Black- Post 166
Bones- DeadPedal replacement mod
Custom made rear shelf (deletes rear seats)
Custom S-Track tie down system
ARB 50 qt Refrigerator/ freezerw/ ARB Fridge Slider with ARB tie down straps
Yeti 45 qt cooler
Custom ARB locker/ Compressor switches
Switches for airbags, PIAA lights and D2's
Factory fog light switches for Lightforce and Scorpions
Ram Mount Computer/ GPS
DIY- 12 Volt receptacle
SpringTail Side M-Pac Rack with Large MOLLE bag
SpringTail M-Pac- 1st Aid MOLLE Bag
TPMS light- always on (same with compass- hoping thy burn out soon)
Custom Aluminum Dead pedal - Bone Offroad
Interior grab handles- Knotworx custom paracord- Thanks Tank Girl
Additional
Expedition One Geri cans- Water x 2 (4 gallons)
Window tint
DYI Tail light tint
Had/ sold/ not installed
17” stock alloys- blacked out w/ 255/80R17 KM2’s Pizza Cutters- not installed
16” x 8” Konig Countersteer Offroad- Bronze- sold
315/75R16 Yokohama Geolander MT + tires- sold
SAW 3” lift w/ 2.5” Coilovers, 2.0” rear shocks and +2’ springs- sold
Total Chaos UCA's- sold
Recon 10500 recovery winch- sold
4” HID Euro beam off road lights- sold
Viking aluminium fairlead- not installed
Spidertrax 1.25” spacer- sold
Pro Comp 55 watt spot lights- Gave away
MAF adj. rear track bar- Gave away
Ricochet LCA armor- sold
Toyota factory front and rear seats- not installed
Toyota factory suspension- Gave away
Demello Hi-Lift mounts (factory roof rack)- sold
Baja Drop-in Roof Basket- sold
Factory roof rack- Gave away (Now "topless")
Bushwacker Pocket Flairs- sold
Bud Built -Mid skid, T/C Skid and Crossmember- Sold
All pro HREW Kick out Sliders- Gave away- with spot missed....
All Pro +3.5” Rear Springs- sold
2.0” Fox Piggyback 8 way adj. shocks- sold
Outrider upper link armor- sold
Ellis Precision Custom aluminum Fairlead- anodized blue- not installed
Metal Tech Tube doors-sold
The Library of Uselessness!!
Most frequently asked question-
What you always wanted to know about LT suspensions but were to afraid to ask-----> POST 564
How to install/use
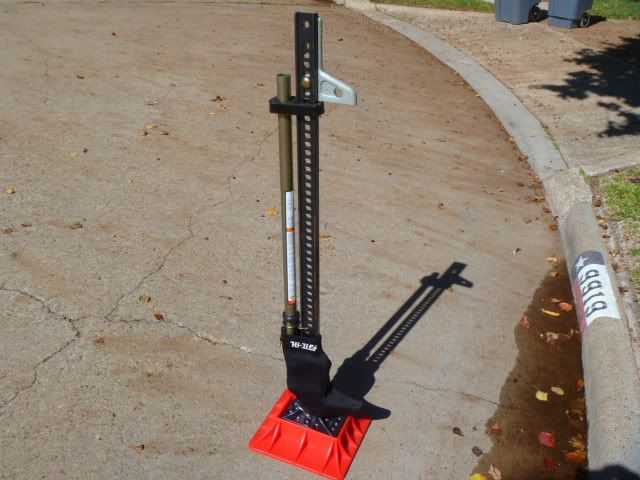
Hi-lift- post 45
Spindle Gussets/ wheel clearance- Post 39 & 40
Light test- post 417
Alignment specs/issues- posts 269, 274 & 356
Installing PRP seats- Posts-492 & 504
Installing camera mount for LoD Bumper swing out- post 537
Removing the factory roof rack- post 640
Marlin Lefty Calculations/ how to calculate low gear ratios- post781
Correcting Timbren Rear Bump Stops- post 967
Beadlocks- section
Install Beadlocks- post 262
How to break a tire bead with a Hi-Lift/ Bead breaker tool- post- 954
How to Balance Beadlocks/ Importance of spacers for rock rings- posts 955 & 956
Beadlock ring failure/ know the signs- post 833
How to remove a sheared off Beadlock rock ring bolt- post 858
Suspension flex pics- posts 170, 356, 363, (Jambo 2012- 509-514)
Jambo- 2012 - posts 509-514
WTF 2012- posts- 832 & 865
LT Crackrock in action- video (WTF 12')- posts- 890 & 899
Epic moments in the thread
How to get neighbors to remove the Baja Drop in basket- post 574
The Birth of the new "Walker/ Beadlock" avatar- 720, 749 & 756- (but you need to read from post 720 on...ROFL)
Recent Sticker Pics- post 803
Buffing out Old Sarge's FJ (AKA the Trail Stripe King!)- post- 678
The FJ- 2010, Warm white:
My experience with 4wd vehicles is limited to an 87 ½ Pathfinder (awesome truck) and 2 Subaru’s. So this was kind of an experiment since I needed a 4wd for work and wanted to get rid of my Dodge 2500 which was a POS. Needed something simple and utilitarian but offered some luxury like a nice stereo and comfortable ride (lots of highway driving too). The FJ fit the bill. According to the dealership in Houston, I took delivery of the 1st 2010 Warm White (didn’t call them Iceburg for some reason) in Houston. The 2nd was sitting next to mine (same truck except with manual- not good for the traffic here). Mine was equipped with basically everything- 4wd, convenience packages, roof rack sill plates, yada, yada, yada…
Name:
I’ve decided to name my truck the Yeti (I think I was one of the 1st yeti’s back in 09 - lots now! No biggie since thanks to another forum member I’ve changed it to the Toyeti!)
Funny thing is that for the purposes of this build thread it will be referred to as my “Crack Rock” since its basically my addiction and is running my wallet dry :lol:
As with any addiction, your need to get the next “mod” has driven me to sell anything not bolted down…:lol: Just ask Chris Delancy
In the Beginning…
Here it is – stock- the only picture I have from the first full day of ownership. Already for my first mod- a new windshield…Yup a rock from a semi wacked me on day one!
![Image]()
Note: To all prospective buyers- get the windshield warranty – I’m now on my 4th in 2 years and it cost me $450 at signing. For reference- that little strip on the top of the windshield is $400.00 by itself and cannot be reused!
So for the record- this was the best mod I’ve ever made! When you work every day at rigs-with no way to heat your meals- The windshield sunshield with great sun heats up meals great
![Image]()
As you can see… this is not the best build thread:lol:
So I tried to keep it clean and stock but I work in the oilfield on rig roads and that wasn’t an option. So after almost getting stuck on Fireroad #2 in Northern Louisiana (never, ever let a GPS be set on “shortest route”- you will regret it…), I made the decision to get my first real modification- tires
Got the 255/80R17 BFG KM2’s aka- pizza cutters since they offered 33.4” of height and no BMC. They worked so well in the gumbo mud, I hardly needed to place it 4wd. Great 1st Mod.
![Image]()
![Image]()
![Image]()
So then I realized I was able to convince my better half this was a work truck and needed to be “correctly adjusted for the environment for which it was intended to be driven in”. She laughed at me and said do whatever you want to it.
2nd modification
RAM computer mount- I worked out of truck sometimes slept in it while I sat at rigs for 36-48 hours.
Wilson multiband Cell/ internet booster- If you live and work south of Shreveport LA- you know what I’m talking about. Cell service (at least in 2009/ 2010) was pretty bad south of I-20, so the booster really helped to stay in touch and also allowed me to go online at the same time with my broadband aircard. The Rollins sticker was placed there from my house to scare off would be thieves....Stickers rule!
![Image]()
No.... your eyes are not playing tricks on you... that is a glowing purple hippo in the background
3rd Modification
All Pro Sliders with kick out and Aero guard headlight guards.- Sliders are great and work well and the headlight covers were in response to my 3rd windshield figuring the chance of losing a headlight are high! My FJ is a magnet for flying objects and road debris. The sliders came in bare metal and were rattle canned to perfection. Usually requires a fresh coat once a year. A piece of cardboard and 10 minutes and they look like new.
![Image]()
![Image]()
4th modification
This one is a bit fuzzy. I basically drove my truck to the DFW area from Shreveport, LA and had the following done.
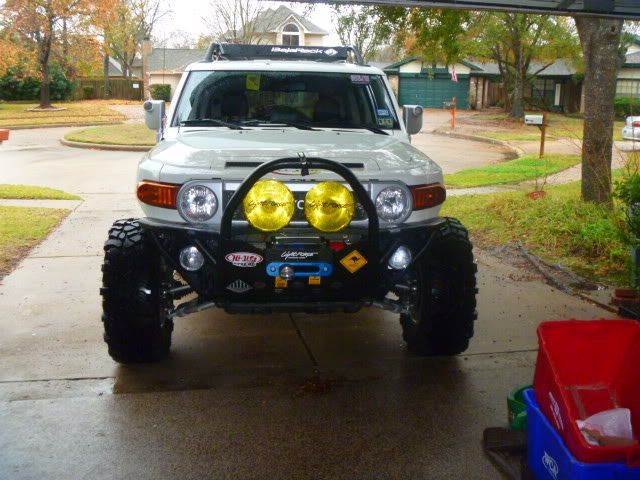
New front bumper- Custom Rocktek with longer “stinger” to clear the lights- plus I always liked the stinger look and Justin basically incorporated his look with what I was looking for and it came out perfect.
![Image]()
Installed at the fabricators home!!
![Image]()
A Note about Justin/ Rocktek- Justin installed my bumper and since I added the Bushwackers actually changed the bumper that night to accommodate them (had to shorten the tubes and then recap them. His work is top notch. He also installed the factory switches inside with the lighting and winch on the bumpers. Excellent work!
New winch- Pathfinder 9000. The Recon 9500 I purchased was integrated and would not fit in the newly designed bumper, so I sold it and purchased the Pathfinder through Justin at cost since we basically found out the first winch wouldn’t fit at install. Mental note- know the difference between integrated and non-integrated. Sold the Recon with the steel cable from the Pathfinder and kept the synthetic line (weight savings of 30 lbs)
![Image]()
![Image]()
![Image]()
Bumper lighting/ off road lights- Big yellows- Blitz 240 from Lightforce (these things light up everything in front of me) and the small procomps for driving lights (being replaced with Dually –D2’s)
![Image]()
Here seen with clear covers (pencil beams)
Bushwacker Flairs- These are a nice mod and easy to install. Was missing one “bolt” in the packet. Called Bushwacker and they sent me an entire whole installation package so now I have tons- Great Customer service!!
![Image]()
![Image]()
![Image]()
Continued below
Ok so I’ve started another build thread partly because the first one stunk and I couldn’t post pictures…
Chances are this one will suck too but oh well- it’s your life to waste looking :lol:
If you like what you see, post a thought at the end. If you dont like what you see....post a thought on Wikids build thread... If you have any cool stickers... send them to me.
http://www.fjcruiserforums.com/foru...ld-ups/110476-my-2010-yeti-warmest-white-beast-outside-himalayan-mountains.html
So here’s my second shot at this…


Current modifications:
Suspension/ Steering-
Front-
All Pro +2” Long Travel (UCA/ LCA)
2.5” Fox Coilovers w/ external reservoirs
Timbren Bump stops
All Pro Spindle Gussets
Total Chaos Tower Gussets
Total Chaos Cam Gussets
Currie +2” CrMo Axles
All Pro HD Steering system
SS extended brake lines
Rear-
Custom Metal Tech Long Travel
ICON Omega Twin Tube Bypass- Custom lengthened for LT set up
Light Racing Jounce Shocks with custom welded spacers
Metal Tech Long Travel Springs
Day Star 1.5" Spring Spacer
Metal Tech 3" Bump Drop spacers
Timbren Bump stops- modified
All Pro HD Upper Links (Control Arms)
Metal Tech Offset Lower Links (Control Arms)
SS extended brake lines
Wheels/ tires/ accessories
17” x 8.5” Trail Ready HD Bead Locks with Blue anodized World Series Rock Rings (w/ double rock ring spacers)- Posts 127 and 262
35” x 12.5” 17R Pitbull Rockers (Tennis ball, golf ball and airsoft pellet balanced)- posts 127, 195 & 262
Spidertrax 1.25” Spacer- Rear only
Gorilla Wheel locks (12mm x 1.5” acorn)- post 483
ARB Airdown tool
Powertank 10lbs CO2 tank- Custom Smoked Bronze w/ upgraded Nitrogen gauges, hose and bag
Powertank Air chuck w/ oil filled Gauge
ARB Compressor (See TC / Gearing)
Transfer Case/ Gearing
Marlin "Lefty" with 30 Spline CroMo Output shafts (Front and Rear), 23 Spline Competition 4.7.1 Gears and 4.0 Inchworm Adapter Plate. Installed with Tummy Tuck package- 4" additional break over clearance.- Posts- 970, 996 & 1000
Nitro 4.56.1 Gears (Front and Rear)
8" ARB Air Locker- RD121 for 8" IFS Clamshell
ARB Compressor- Hi-output- CKMA12- 12 Volt w/ 2 Gallon reserve tank- Air lines plumbed to both front and rear bumpers with quick connects (also used to activate locker)- Post 1062
Armor/ Exterior
Front Bumper- Custom Rocktek w/ stinger
Rear Bumper- LoD with Tire Swing out- includes Hi-Lift mount, RotoPax mounts and tray- Posts- 534, 537 & 545
Briareos Bumper Mod
Bud Built 5 piece "Tummy Tuck" skids- PC Hammertone Grey
Bud Built Rear Differential Skid- PC Hammertone Grey- post 483
All Pro APEX DOM Kick-Out Sliders- Won from All Pro-Yea!!
Rocktec Upper link armor
Outrider Lower link armor
FJToyman Shock armor- compliments of Joe!
Aero Light Guards
Kill Helmet!- post-115
Plastic fender removal
Pinch weld "correction"
BMC
Threadworkz Custom CB antenna Flags (Toyeti & Punisher)
Lighting
1- 40" Rigid E-Series light Bar w/ custom roof rack delete mount (not installed)
1 Pair- Lightforce Blitz 240’s with yellow/ clear lens covers/diffusers spot/flood combo beam
1 Pair- Scoprion-LED 109 watt LED (5”)- flood beam- Post 392, 417 and 504
1- Scorpion-LED 12 degree Spot light (Prototype)- Cyclops
1 Pair- Rigid Dually D2’s- euro beam- Post 417 and 504
1 Pair- PIAA LP530- LED lights in rear bumper
LA Trail Teams 10- Side Mirror Light Mod- Amber LED-Thanks Erick!
Recovery
Pathfinder 9000 lbs non integrated winch
Warn Industries Winch selonoid shut off w/ remote switch
50’ Viking 3/8” Amstell Blue Synthetic winch line with safety thimble and rubber protector
Demello Offroad Black aluminum Fairlead- Custom Fatty
48” Hi-Lift Extreme
Hi-Lift Base
Rocktek Hi-Lift/ Slider adaptor
Bushranger X-Jack (AKA- The Orange Marshmallow)
ARB Premium Recovery (9000 Snatch block, Snatch strap, Tree saver, Winch extension, Shackles, winch line isolator and gloves)
Wheel chocks
Tool Bag- various hand/ airtools
Milwaukee ½” cordless impact gun
RotoPax 4 x 2 Gallon gas cans
(2) Trail Spare +2” CV's
Additional Shackles
Sound system- 17 speakers
Pioneer AVH- P8400BH head unit
JL Audio XD600/6 600watt x 6 amplifier
JL Audio XD500/3 100watt x 2/ 300watt x 1 amplifier
JL Audio remote level controller
6 x 9" Focal Access 690 CA1 SG's 2-Way Coaxial speakers (Door)
TacoTunes 6 x 9" Speaker door mounts
3 1/2" Infinity Reference 3002CFX 2-Way Coaxial speakers- (Dash)
4" Focal Polyglass 100CVX 2-Way Coaxial speakers (Rear Pods)
4" VersaPod enclosures
3 1/2" Polk Audio DXi350 2-Way Coaxial speakers (Rear Pillar)
10" JL Audio 10TW3 Slimline Sub woofer
SubThump FJ Cruiser subwoofer enclosure
KnuKonceptz Kolossus Flex Kable 0 gauge OFC wire-main
Kicker 4 gauge OFC wire- to amps and ground
100 amp AGU Fuses/ 50 amp MAXI fuses
12 gauge Monster speaker wire throughout- soldered connections
JL Audio power distribution block and Battery mount
Dynomat Xtreme Light- 20 sq ft- front doors
Fat Mat sound insulator- 100 sq/ft- floor/ walls/ remaining doors
Communication/ Audio
Cobra LX 29 Limited Edition -Post- 537
Astatic Noise Cancelling Microphone
4’ Firestik FS4 antenna
Firestik SS Spring
Quik-Disconnect
Bandi Mount
Astatic PDC1 SWR meter
Panasonic Toughbook CF-18 w/ GPS Trackmaker & Verizon 4G Mobil broadband
Wilson 801212 Dual Band Car Cell Phone Booster Antenna
Garmin Nuvi 500- Offroad GPS
Banks IQ - OBD2 controller/ scanner
Engine/ Electric Other
TRD Drop-in filter
Megan SS catback exhaust- post 309
Dirty Parts Dual Battery Kit w/ Odyssey PC2150 battery and Sears Platinum Battery w/ Lots of booger weldz- post 505
Blue Sea Systems 3000HD battery switch/ single circuit On/Off- 600 amp continuous
2 gauge OFC w/ copper connectors- crimped and soldered- upgrade to factory alternator/ ground system
Blue Sea HD Series Battery Switch- rated at 600 amps continuos
Lots of stickers
Interior
PRP Podium Racing seats- post- 485, 492 & 504
Metal Tech PRP seat brackets w/ SRS delete switch Post 492, 504 & 537
Ellis Precision shifter handle- Stealth Black- Post 166
Bones- DeadPedal replacement mod
Custom made rear shelf (deletes rear seats)
Custom S-Track tie down system
ARB 50 qt Refrigerator/ freezerw/ ARB Fridge Slider with ARB tie down straps
Yeti 45 qt cooler
Custom ARB locker/ Compressor switches
Switches for airbags, PIAA lights and D2's
Factory fog light switches for Lightforce and Scorpions
Ram Mount Computer/ GPS
DIY- 12 Volt receptacle
SpringTail Side M-Pac Rack with Large MOLLE bag
SpringTail M-Pac- 1st Aid MOLLE Bag
TPMS light- always on (same with compass- hoping thy burn out soon)
Custom Aluminum Dead pedal - Bone Offroad
Interior grab handles- Knotworx custom paracord- Thanks Tank Girl
Additional
Expedition One Geri cans- Water x 2 (4 gallons)
Window tint
DYI Tail light tint
Had/ sold/ not installed
17” stock alloys- blacked out w/ 255/80R17 KM2’s Pizza Cutters- not installed
16” x 8” Konig Countersteer Offroad- Bronze- sold
315/75R16 Yokohama Geolander MT + tires- sold
SAW 3” lift w/ 2.5” Coilovers, 2.0” rear shocks and +2’ springs- sold
Total Chaos UCA's- sold
Recon 10500 recovery winch- sold
4” HID Euro beam off road lights- sold
Viking aluminium fairlead- not installed
Spidertrax 1.25” spacer- sold
Pro Comp 55 watt spot lights- Gave away
MAF adj. rear track bar- Gave away
Ricochet LCA armor- sold
Toyota factory front and rear seats- not installed
Toyota factory suspension- Gave away
Demello Hi-Lift mounts (factory roof rack)- sold
Baja Drop-in Roof Basket- sold
Factory roof rack- Gave away (Now "topless")
Bushwacker Pocket Flairs- sold
Bud Built -Mid skid, T/C Skid and Crossmember- Sold
All pro HREW Kick out Sliders- Gave away- with spot missed....
All Pro +3.5” Rear Springs- sold
2.0” Fox Piggyback 8 way adj. shocks- sold
Outrider upper link armor- sold
Ellis Precision Custom aluminum Fairlead- anodized blue- not installed
Metal Tech Tube doors-sold
The Library of Uselessness!!
Most frequently asked question-
What you always wanted to know about LT suspensions but were to afraid to ask-----> POST 564
How to install/use
Hi-lift- post 45
Spindle Gussets/ wheel clearance- Post 39 & 40
Light test- post 417
Alignment specs/issues- posts 269, 274 & 356
Installing PRP seats- Posts-492 & 504
Installing camera mount for LoD Bumper swing out- post 537
Removing the factory roof rack- post 640
Marlin Lefty Calculations/ how to calculate low gear ratios- post781
Correcting Timbren Rear Bump Stops- post 967
Beadlocks- section
Install Beadlocks- post 262
How to break a tire bead with a Hi-Lift/ Bead breaker tool- post- 954
How to Balance Beadlocks/ Importance of spacers for rock rings- posts 955 & 956
Beadlock ring failure/ know the signs- post 833
How to remove a sheared off Beadlock rock ring bolt- post 858
Suspension flex pics- posts 170, 356, 363, (Jambo 2012- 509-514)
Jambo- 2012 - posts 509-514
WTF 2012- posts- 832 & 865
LT Crackrock in action- video (WTF 12')- posts- 890 & 899
Epic moments in the thread
How to get neighbors to remove the Baja Drop in basket- post 574
The Birth of the new "Walker/ Beadlock" avatar- 720, 749 & 756- (but you need to read from post 720 on...ROFL)
Recent Sticker Pics- post 803
Buffing out Old Sarge's FJ (AKA the Trail Stripe King!)- post- 678
The FJ- 2010, Warm white:
My experience with 4wd vehicles is limited to an 87 ½ Pathfinder (awesome truck) and 2 Subaru’s. So this was kind of an experiment since I needed a 4wd for work and wanted to get rid of my Dodge 2500 which was a POS. Needed something simple and utilitarian but offered some luxury like a nice stereo and comfortable ride (lots of highway driving too). The FJ fit the bill. According to the dealership in Houston, I took delivery of the 1st 2010 Warm White (didn’t call them Iceburg for some reason) in Houston. The 2nd was sitting next to mine (same truck except with manual- not good for the traffic here). Mine was equipped with basically everything- 4wd, convenience packages, roof rack sill plates, yada, yada, yada…
Name:
I’ve decided to name my truck the Yeti (I think I was one of the 1st yeti’s back in 09 - lots now! No biggie since thanks to another forum member I’ve changed it to the Toyeti!)
Funny thing is that for the purposes of this build thread it will be referred to as my “Crack Rock” since its basically my addiction and is running my wallet dry :lol:
As with any addiction, your need to get the next “mod” has driven me to sell anything not bolted down…:lol: Just ask Chris Delancy
In the Beginning…
Here it is – stock- the only picture I have from the first full day of ownership. Already for my first mod- a new windshield…Yup a rock from a semi wacked me on day one!

Note: To all prospective buyers- get the windshield warranty – I’m now on my 4th in 2 years and it cost me $450 at signing. For reference- that little strip on the top of the windshield is $400.00 by itself and cannot be reused!
So for the record- this was the best mod I’ve ever made! When you work every day at rigs-with no way to heat your meals- The windshield sunshield with great sun heats up meals great

As you can see… this is not the best build thread:lol:
So I tried to keep it clean and stock but I work in the oilfield on rig roads and that wasn’t an option. So after almost getting stuck on Fireroad #2 in Northern Louisiana (never, ever let a GPS be set on “shortest route”- you will regret it…), I made the decision to get my first real modification- tires
Got the 255/80R17 BFG KM2’s aka- pizza cutters since they offered 33.4” of height and no BMC. They worked so well in the gumbo mud, I hardly needed to place it 4wd. Great 1st Mod.


So then I realized I was able to convince my better half this was a work truck and needed to be “correctly adjusted for the environment for which it was intended to be driven in”. She laughed at me and said do whatever you want to it.
2nd modification
RAM computer mount- I worked out of truck sometimes slept in it while I sat at rigs for 36-48 hours.
Wilson multiband Cell/ internet booster- If you live and work south of Shreveport LA- you know what I’m talking about. Cell service (at least in 2009/ 2010) was pretty bad south of I-20, so the booster really helped to stay in touch and also allowed me to go online at the same time with my broadband aircard. The Rollins sticker was placed there from my house to scare off would be thieves....Stickers rule!

No.... your eyes are not playing tricks on you... that is a glowing purple hippo in the background
3rd Modification
All Pro Sliders with kick out and Aero guard headlight guards.- Sliders are great and work well and the headlight covers were in response to my 3rd windshield figuring the chance of losing a headlight are high! My FJ is a magnet for flying objects and road debris. The sliders came in bare metal and were rattle canned to perfection. Usually requires a fresh coat once a year. A piece of cardboard and 10 minutes and they look like new.


4th modification
This one is a bit fuzzy. I basically drove my truck to the DFW area from Shreveport, LA and had the following done.
New front bumper- Custom Rocktek with longer “stinger” to clear the lights- plus I always liked the stinger look and Justin basically incorporated his look with what I was looking for and it came out perfect.

Installed at the fabricators home!!

A Note about Justin/ Rocktek- Justin installed my bumper and since I added the Bushwackers actually changed the bumper that night to accommodate them (had to shorten the tubes and then recap them. His work is top notch. He also installed the factory switches inside with the lighting and winch on the bumpers. Excellent work!
New winch- Pathfinder 9000. The Recon 9500 I purchased was integrated and would not fit in the newly designed bumper, so I sold it and purchased the Pathfinder through Justin at cost since we basically found out the first winch wouldn’t fit at install. Mental note- know the difference between integrated and non-integrated. Sold the Recon with the steel cable from the Pathfinder and kept the synthetic line (weight savings of 30 lbs)


Bumper lighting/ off road lights- Big yellows- Blitz 240 from Lightforce (these things light up everything in front of me) and the small procomps for driving lights (being replaced with Dually –D2’s)

Here seen with clear covers (pencil beams)
Bushwacker Flairs- These are a nice mod and easy to install. Was missing one “bolt” in the packet. Called Bushwacker and they sent me an entire whole installation package so now I have tons- Great Customer service!!


Continued below


")