

My supercharger belt has been looking pretty ragged for a while and it was starting to worry me. It was time to change it. I wasn't able to find any "how to" threads so I thought I would add my own so that others can benefit from my experience. My mechanical training consists of 9 weeks of Freshman autoshop (1982) and owning a Jeep TJ for 10 years.
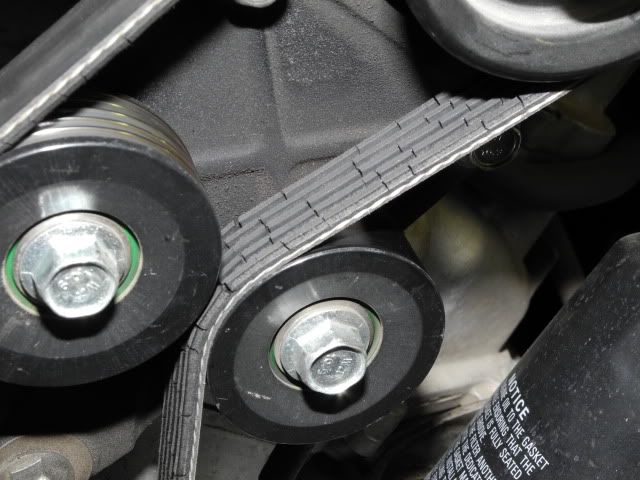
The belt has 9505 miles on it and is the original belt. I ordered a spare belt shortly after having the supercharger installed and I installed that belt. The replacement belt is the same make (Dayco) as the original belt. As you can see, the original belt has multiple cracks in it.
![Image]()
First, remove the skid plate. I have the stock skids so 4 bolts (12mm socket) need to be removed and the skid comes right off.
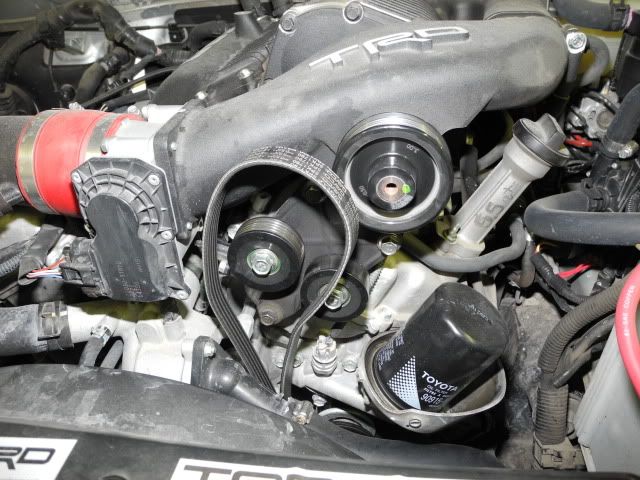
Next, using a Harbor Frieght serpentine belt tool I rotated the tensioner arm up to release the tension in the supercharger belt and removed the belt from the supercharger pulley.
![Image]()
![Image]()
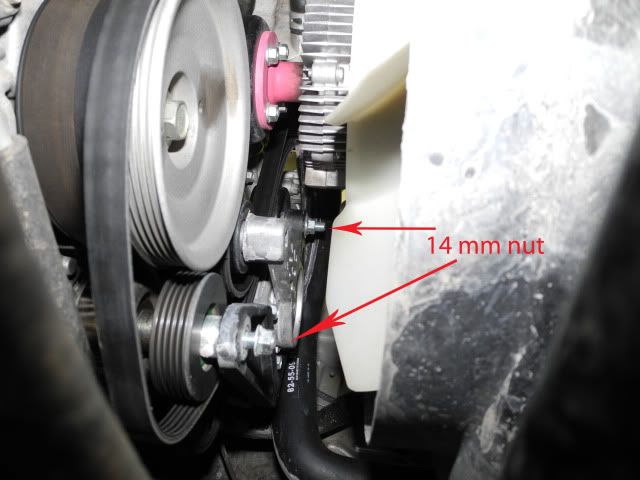
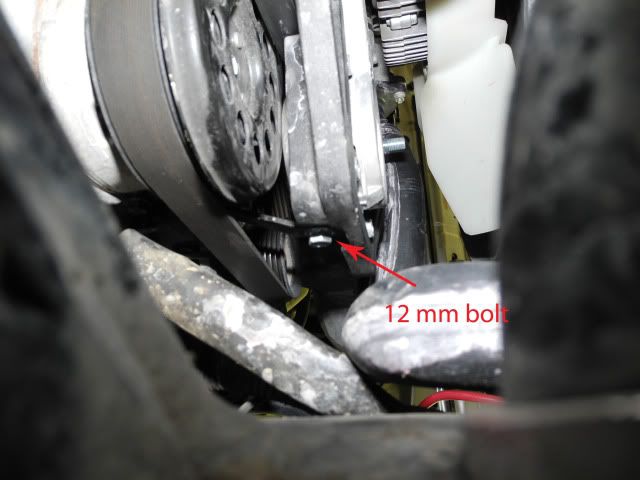
Next, from underneath, the tensioner needs to be removed. This is accomplished by removing 2 nuts (14mm deep socket), and 1 bolt located on the drivers side (12mm socket).
![Image]()
![Image]()
The tensioner slides off towards the fan. Be sure to leave pulleys and spacers on the studs.
![Image]()
The old belt can now be removed. Feed the new belt from above and place on the lower pulleys, leave a loop in the belt for the tensioner pulley. Be sure to check for proper belt routing on the sticker under your hood. Also check to make sure the belt is aligned properly on the pulleys.
Reinstall the belt tensioner. Be sure to start the bolt prior to tightening down the 2 nuts.
From above, using the Harbor Frieght tool, swing the tensioner arm up and slip the belt over the supercharger pulley and then release the tensioner arm. Be sure to observe proper belt routing and alignment. Recheck belt alignment on the lower pulleys.
Reinstall skid plate and your done.
edit: The Toyota replacement belt # is PTR30-35070 or a Dayco 5PK1790.
The belt has 9505 miles on it and is the original belt. I ordered a spare belt shortly after having the supercharger installed and I installed that belt. The replacement belt is the same make (Dayco) as the original belt. As you can see, the original belt has multiple cracks in it.
First, remove the skid plate. I have the stock skids so 4 bolts (12mm socket) need to be removed and the skid comes right off.
Next, using a Harbor Frieght serpentine belt tool I rotated the tensioner arm up to release the tension in the supercharger belt and removed the belt from the supercharger pulley.
Next, from underneath, the tensioner needs to be removed. This is accomplished by removing 2 nuts (14mm deep socket), and 1 bolt located on the drivers side (12mm socket).
The tensioner slides off towards the fan. Be sure to leave pulleys and spacers on the studs.

The old belt can now be removed. Feed the new belt from above and place on the lower pulleys, leave a loop in the belt for the tensioner pulley. Be sure to check for proper belt routing on the sticker under your hood. Also check to make sure the belt is aligned properly on the pulleys.
Reinstall the belt tensioner. Be sure to start the bolt prior to tightening down the 2 nuts.
From above, using the Harbor Frieght tool, swing the tensioner arm up and slip the belt over the supercharger pulley and then release the tensioner arm. Be sure to observe proper belt routing and alignment. Recheck belt alignment on the lower pulleys.
Reinstall skid plate and your done.
edit: The Toyota replacement belt # is PTR30-35070 or a Dayco 5PK1790.
")


