

Well, I fixed my own alternator this morning...
After I left my house to go get coffee from the
local WaWa, I had the battery symbol idiot light
come on, really a erratic flashing, it seemed to
be effected by the rpm range some too, and at
some points, it would be steady on...
I looked at the voltmeter, and it was still in the
charging range, but at the bat' light illuminated,
the needle would dive just a tad... I pulled over
and checked the bat' terminals and they were
clean and tight, I also checked the stock bat'
sight window, and it was blue, which means it was
ok too...
Now, I pulled ok the glove box manual for yucks,
and the only thing they wrote under this light was
to contact toyota right away... This was a little
worrisome to say the least.. I am thinking that
this could end up costing some bucks... My thoughts
based on the the symptoms are that the alternator
has gone bad in some way or the regulator was
not distributing the power correctly...
I opened the hood and decided to do a small test
to make sure my guess was right, so I took a can
of brake cleaner, and sprayed though the openings
in the alternator to see if it had any effect, and it
did, the light went out in the dash, but soon came
back on after 10 minutes, but it proved my theory...
Now being that I have used my FJ for offroading, I
knew this wold not be covered by warranty due to
the flash muddy water storms my FJ has seen,
even if it was not related... ... I did check on the
price for a new alternator just for yucks, $478.05, a
tad bit pricey, But I don't want to just toss that cash
out just yet, so I figured I would pull the alternator
out and disect it a little, so below is the outcome...
First you need to remove the Alternator from the FJ...
To do this, you need to remove the battery wires from
the battery using a 10mm socket or wrench, then use
the same for removing the battery hold downs, and
then remove the battery itself along with the plastic
tray... This needs to be done in order lift the alt' up
through the opening...
![Image]()
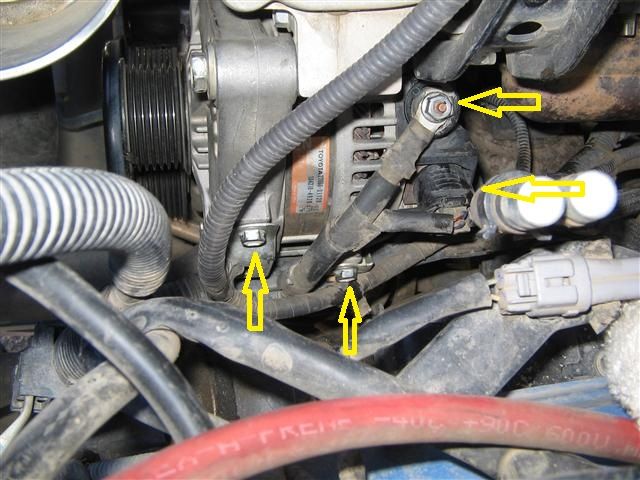
Next, remove the two of the push pins holing part
of the rubber flap in the wheel well, one pin in the
shock tower, and one in the frame rail, so you can
access a few of the wire harness bracket bolts...
Then using a 10mm socket to remove the two bolts
from the side of the alt' and one at the side of the
battery mount base, which will allow movement in
the harness necessary for the alt' to have enough
room to get through...
![Image]()
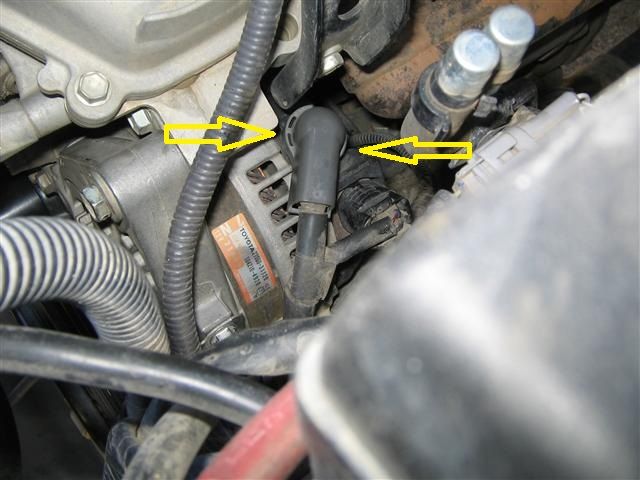
You will also need to remove the wire connections
from the alt', one is a 4 wire connector, which you
need to squeze the tab with your finger to release it
and then unplug it... The second on has a grey round
cover which snaps on, which can be removed by
placing a small flat tip screw driver in one of the slots
and pry slighty to release it, then use a 10mm socket
to remove the nut holding the wire on... You can see
the connection point here below...
![Image]()
![Image]()
Next, using a 10mm socket, remove the engine top
cover so you have room to get release to tensioner
for the serp' belt...
![Image]()
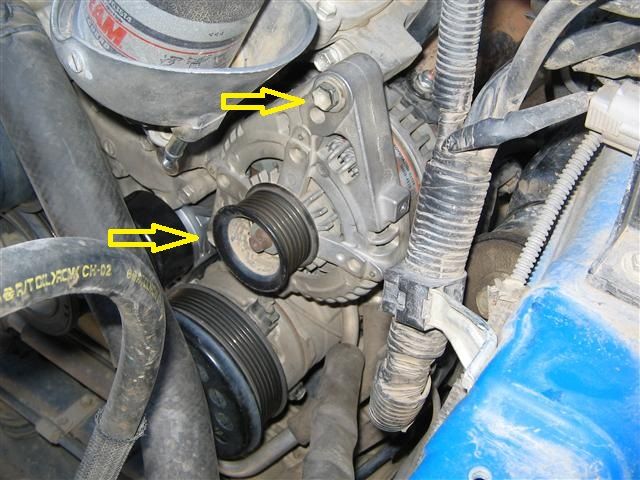
Next, you will need to use a 14mm socket to release
the tensioner for the serp' belt and remove the belt
from the alt' pully... In the pict' below, you can see
the belt stuffed forward near the fan area so you have
room to work... Now use the 14mm socket and remove
the two bolts that hold the alt' in place, these are
both accessed from the front of the alt area, one
towards the bottom and one on top, again, you can
see the two hole locations in the photo below...
![Image]()
![Image]()
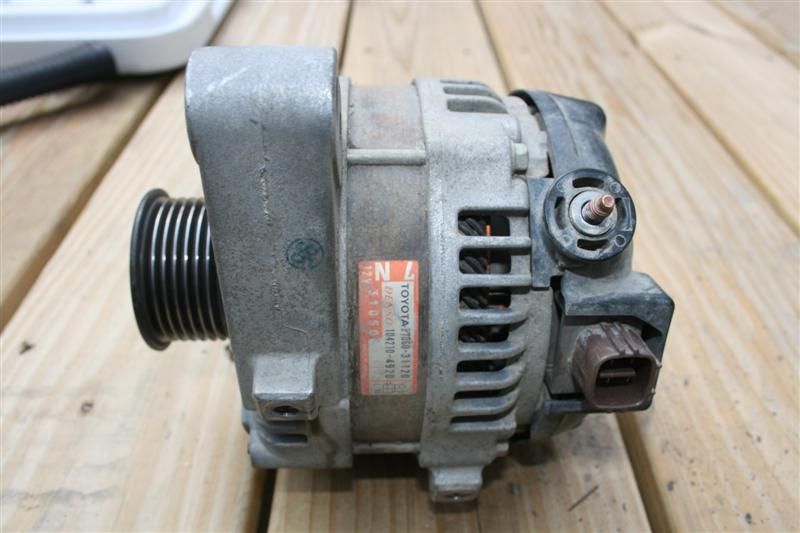
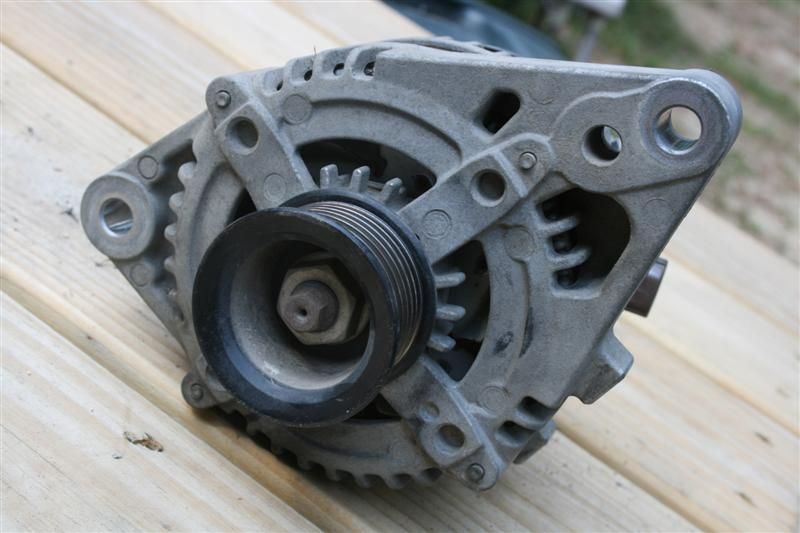
Once the bolts are remove, you will need to move
the alt' up and down and wiggle it in and out to get
it free, and maybe use a pry bar between the engine
and the alt, to pry outward a tad... Once it's free,
you can maneuver it upward and out...
![Image]()
![Image]()
![Image]()
MORE IN NEXT POST !...
After I left my house to go get coffee from the
local WaWa, I had the battery symbol idiot light
come on, really a erratic flashing, it seemed to
be effected by the rpm range some too, and at
some points, it would be steady on...
I looked at the voltmeter, and it was still in the
charging range, but at the bat' light illuminated,
the needle would dive just a tad... I pulled over
and checked the bat' terminals and they were
clean and tight, I also checked the stock bat'
sight window, and it was blue, which means it was
ok too...
Now, I pulled ok the glove box manual for yucks,
and the only thing they wrote under this light was
to contact toyota right away... This was a little
worrisome to say the least.. I am thinking that
this could end up costing some bucks... My thoughts
based on the the symptoms are that the alternator
has gone bad in some way or the regulator was
not distributing the power correctly...
I opened the hood and decided to do a small test
to make sure my guess was right, so I took a can
of brake cleaner, and sprayed though the openings
in the alternator to see if it had any effect, and it
did, the light went out in the dash, but soon came
back on after 10 minutes, but it proved my theory...
Now being that I have used my FJ for offroading, I
knew this wold not be covered by warranty due to
the flash muddy water storms my FJ has seen,
even if it was not related...
... I did check on the price for a new alternator just for yucks, $478.05, a
tad bit pricey, But I don't want to just toss that cash
out just yet, so I figured I would pull the alternator
out and disect it a little, so below is the outcome...
First you need to remove the Alternator from the FJ...
To do this, you need to remove the battery wires from
the battery using a 10mm socket or wrench, then use
the same for removing the battery hold downs, and
then remove the battery itself along with the plastic
tray... This needs to be done in order lift the alt' up
through the opening...

Next, remove the two of the push pins holing part
of the rubber flap in the wheel well, one pin in the
shock tower, and one in the frame rail, so you can
access a few of the wire harness bracket bolts...
Then using a 10mm socket to remove the two bolts
from the side of the alt' and one at the side of the
battery mount base, which will allow movement in
the harness necessary for the alt' to have enough
room to get through...

You will also need to remove the wire connections
from the alt', one is a 4 wire connector, which you
need to squeze the tab with your finger to release it
and then unplug it... The second on has a grey round
cover which snaps on, which can be removed by
placing a small flat tip screw driver in one of the slots
and pry slighty to release it, then use a 10mm socket
to remove the nut holding the wire on... You can see
the connection point here below...
Next, using a 10mm socket, remove the engine top
cover so you have room to get release to tensioner
for the serp' belt...

Next, you will need to use a 14mm socket to release
the tensioner for the serp' belt and remove the belt
from the alt' pully... In the pict' below, you can see
the belt stuffed forward near the fan area so you have
room to work... Now use the 14mm socket and remove
the two bolts that hold the alt' in place, these are
both accessed from the front of the alt area, one
towards the bottom and one on top, again, you can
see the two hole locations in the photo below...

Once the bolts are remove, you will need to move
the alt' up and down and wiggle it in and out to get
it free, and maybe use a pry bar between the engine
and the alt, to pry outward a tad... Once it's free,
you can maneuver it upward and out...

MORE IN NEXT POST !...


